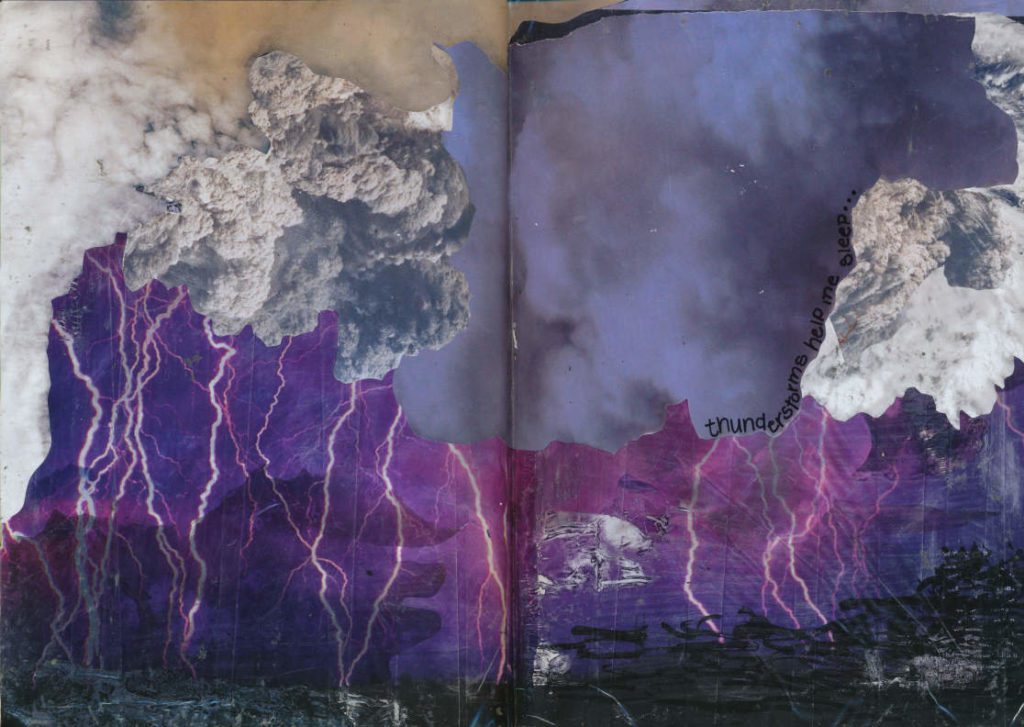
I would take a good thunderstorm over a beautiful, 72-degree, sunny day, any day. That is what this tape transfer thunderstorm visual journal page is all about.
There is something about the feeling of a storm. The sense of it moving in as the air suddenly drops in temperature, the swish of the wind through the trees, and the sudden stillness in between. The drizzle of rain drops as they fall heavier and faster. That first crack of thunder always gives me goosebumps.
As a child when thunderstorms came through I would sit with my Granddaddy and count the seconds between the flash of lightning and rumble of thunder. We would determine whether the storm was moving closer or farther away, as I secretly wished for the thunder to continue moving closer to us.
I look forward to spring showers every year. As the weather begins to change and rain fall is more frequent, I can’t wait for the rainy nights. The best nights of sleep are the nights that rain is falling. When I am startled awake by a clap of thunder, I jolt out of sleep, only to smile, sigh, settle in, and listen for the next roll of thunder.
SUPPLIES
- Visual journal
- Rubber cement and Elmer’s glue
- Scissors
- Magazine images of clouds
- Laser printed images of lightning
- Packaging tape
- Sharpie
HOW TO
I was very excited about creating this visual journal page when I stumbled on the amazing images of storms in one of my “National Geographic” magazines. As soon as I flipped to the page and saw the amazing, rolling clouds, I had my page in mind. I knew the tape transfer technique would be at the center of it.
I decided to cover the entire background with cut-out clouds, and lay a tape transfer of lightning on top, and add another layer of clouds over the tape transfer. I knew the layer of clouds peeking through the semi-transparent tape transfer would look amazing. I was convinced my plan would work, and got started.
Before I knew it the background was complete. I used scissors to cut out the clouds and rubber cement to glue them down. I then moved to my computer and found the perfect image of lightning.
In order to do a tape transfer you either need a photocopied image, a laser-printed image, or an image from a magazine that prints high-quality images (Ex: National Geographic, Vogue). You take your image, and lay strips of packaging tape on top, with the sticky side, stuck on top of the image you want to be transferred. After the tape is stuck, flip the image over, and burnish the back with a spoon or scissor handles (rub the back to make sure it is will stuck to the tape). Take the image and soak it in water until the paper starts to separate from the tape. Remove the image from the water and rub the paper off until all you have left is the ink stuck to the packaging tape.
If you have a lot of white areas in the image the paper will rub off entirely and the tape will easily stick to your book page. If you have a lot of colors (like my lightning) you will have to add an adhesive to get the tape to stick. Never use rubber cement with tape, it creates an odd reaction, and will cause the tape to bubble. Use Elmer’s glue instead!
Once my background was ready I added to the tape transfer on top. I was very bummed when I realized the purple color behind the lightning entirely blocked out all of the beautiful clouds I glued down. I decided to try adding the extra clouds to the top of the page, which helped get my point across, but I still wasn’t completely satisfied with the background.
At this point, the page wasn’t exactly the vision I had, but I was tired of working on it. I decided to go ahead and add the words with a sharpie. To this day every now and then I think about going back and rework it, but I have yet to do it.
CHALLENGE
Create a page about your favorite type of weather.
Thanks for taking the time to check out my blog and read my post! I hope you are inspired to start your own visual journal, or find new techniques to use in your already-started journal. Help me spread the word by sharing with others. Check out more visual journal blog posts here. Don’t forget to follow me on Instagram and TikTok for weekly visual journal demos. Until next time!
Related Posts


Leave a Reply