THE STORY
Exactly one week after I got engaged, I bought my wedding dress. I went to one store, tried on a few dresses, got an idea for the style I wanted, and attended a bridal show the following weekend. I tried on a couple of dresses there, not finding much, until I put my dress on. I loved it as soon as I looked in the mirror. I was afraid to commit, but at the same time, I couldn’t take it off. I stood in the mirror for a little too long, girls kept walking by, complimenting me, eying my dress; but I wasn’t going to let them have it. I eventually took it off, we bought it, and I took it home that day.
My wedding dress was a piece of cake. The bridesmaid dresses, however, were a different story. I didn’t want anything that looked “bridesmaidy.” No pink taffeta, crazy bows, poofs, odd lengths, and unflattering styles for me. I dragged my wonderful mom and sister to no less than 10 different stores. We tried every bridal store in town and every dress-carrying store in the mall. Yet, the search was still on.
When it comes to bridesmaid dresses you can run into issues because you want a reasonable price, a flattering style, and something that will make everyone happy; and with eight bridesmaids I was feeling a little stressed. I finally settled on a pretty dark brown, cotton dress from J. Crew. I didn’t feel the instant love when Christy put it on and modeled it for me. Instead, I felt a bit of defeat. It was cute, it would look nice, it would do. I didn’t dislike the dress, in fact, I really do love it. We had a beautiful wedding, but by the end of the process, I didn’t really care. I just needed my bridesmaids to be clothed. The dresses were by far the most difficult art of the wedding planning process, but it did get done, and as everyone says, I really think they will be able to wear it again.
HOW TO
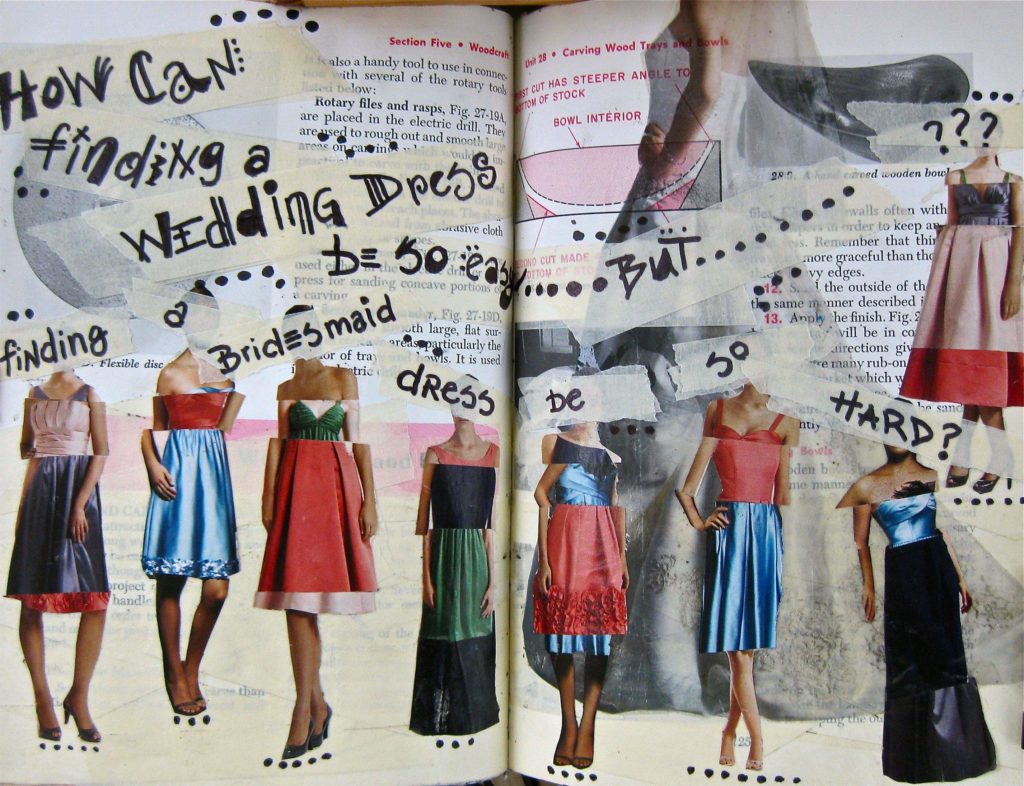
To create this page I used magazine cutouts, masking tape, and a tape transfer of a magazine image. Masking tape creates a nice, semi-transparent, neutral background. I decided it would be fun to play around with layering the tape and I liked the texture and pattern it created because it was interesting but not overpowering.
- I saved pictures of bridesmaid-looking dresses until I had eight because I wanted to represent each of my bridesmaids. I decided to cut them out and mix and match them because it reflected how I liked pieces of dresses, yet none of them were perfect.
- I also wanted to include a wedding dress, because that is what I thought would be the challenge, but it needed to be secondary to the bridesmaid dresses, so I did a tape transfer (to find out how to do a tape transfer (check out a quick overview on this technique here).
- To complete the page I placed tape over the model’s heads from the journal page, I did this so they could represent any of my bridesmaids.
- I then added words using a sharpie, and to make it more playful I used a variety of fonts.
CHALLENGE
Create a visual journal page that incorporates masking tape. Use it as a background, a place to add words, or cut it out, layer it and create an image out of it!
Thanks for checking out one of my early visual journal pages, check out more here. Interested in tools to help make your teaching life easier? Check out my art education resources here. Don’t forget to connect on Instagram and TikTok for tutorials and more.


Leave a Reply