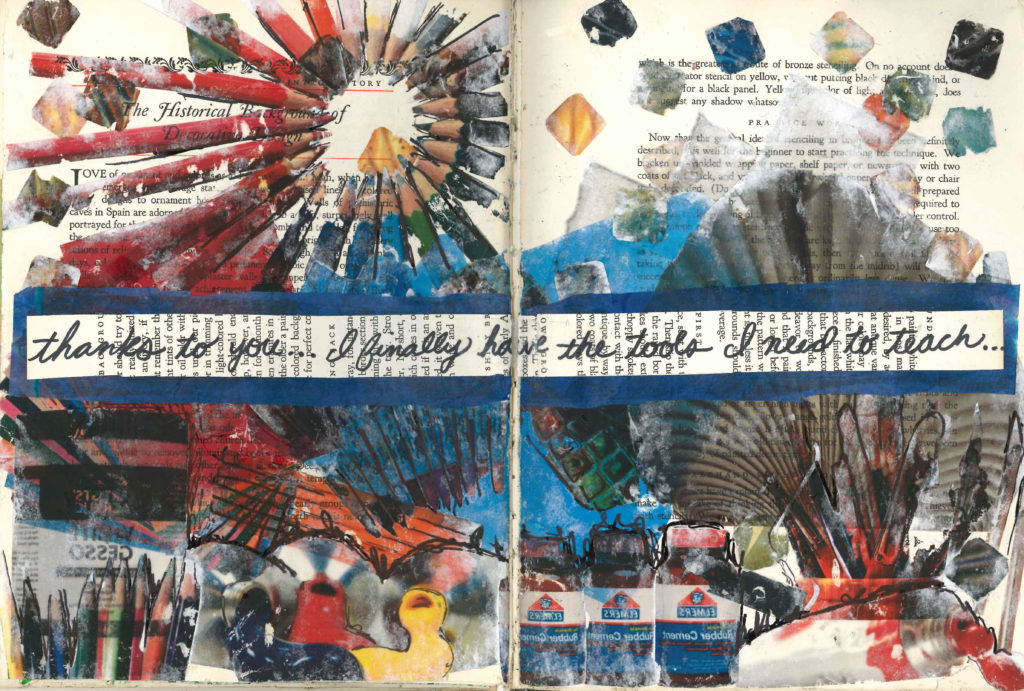
Check out how I use Mod Podge transfer of images to create this visual journal page.
THE STORY
For the first two years of my art education career, I struggled to get the supplies I needed to teach my classes.
For two years I begged, traded, sought out donations and grants, I even sold baked goods at lunch to raise money for my art program. Each year I found a way to scrape by. My students were still exposed to drawing, painting, and a bit of clay when the budget allowed. Occasionally, assignments had to be altered in the middle, when supplies began to run low. My sculpture class turned into a drawing/painting class towards the end of the semester when I could no longer afford the supplies. But, we made do, and my students still created amazing works of art.
While the experience was frustrating at times, I did teach me an important lesson in conservation and waste. Suddenly, every sheet of paper was precious. When students hit the point of crumpling their papers in frustration, they would learn a lesson in perseverance. Instead of being thrown away, their paper was flattened, and they had to continue on.
In addition to learning how to conserve, re-use, and extend supplies, I also learned who the resourceful people in school were. A nice smile, a thoughtful gesture, and going out of your way to ask someone how their day is, is a simple thing to do, and it comes with its own benefits. By the time I left my school I had the janitors on the lookout for items I could use, teachers sending over random assortments of bottle caps and wire hangers, and I had the notoriously difficult-to-please bookkeeper on my side. While every person who sent over a stack of paper or extra supplies played an important role in keeping my program alive, the bookkeeper was the reason my final year there was a success.
I remember the very first day I started at that school. I was assigned a mentor teacher to show me the ropes, explain the grade book process, attendance, expectations, everything I needed to know to get by. While each of these pieces were essential to surviving my first year, one of the most important things she introduced me to were the school politics. Who you needed to be sweet to from day one, whose toes not to step on, and who really held the power in the school. I learned quickly Mrs. Bookkeeper was not one to mess with. People were moved to her bad list on a whim, and she was definitely the blood supply of the school.
From day one I was sweet to her. I always read her instructions twice, immensely apologized if anything went wrong, and made sure to get to know her, rather than just ask for favors. Over the years I learned she was married, with no kids, but loved her nephews as her own, was a big supporter of all the school sports, and was kind despite her tough exterior.
My third and final year I walked to her office, dreading the budget conversation. Each year my budget was reduced a little more, it went from $750.00 to $300.o0, for supplies to cover 150+ students. Rumors of further budget cuts were already in the air, and I expected them to say I couldn’t spend any money. In the back of my mind I already had pencil and paper only projects on hand.
We sat down, she shuffled some papers, and I couldn’t believe what came next. She explained she knew I had a tough couple of years and I had done a good job staying within my allotted budget. She knew I was extremely low or completely out of basic supplies. She said to make a wish list of everything I want, covering basic supplies and additional supplies I could never get before. She told me to hand over the list, and she would see what she could do. It was scary to think I may get some or none of my requested supplies, but I felt confident she would help me out.
I put together my dream wish list. I added everything I thought was feasible, and had nearly $2500.00 in supplies. More than double any budget given to me in the past. I prioritized the items and submitted it, keeping my fingers crossed that I would maybe get half. A few days later Mrs. Bookkeeper called me into her office yet again. “We are getting you everything on the list,” she said. I almost fell over.
Finally I had the tools I needed to teach my students the way I wanted to teach them. Finally I had the support I needed and the supplies I needed. Mrs. Bookkeeper played a very important role in making my final year at that school a good one. I didn’t go out with a bad taste in my mouth, full of resent for the public school system. Instead, I went out feeling like I saw a glimpse of what the school should be.
Thank you.
SUPPLIES
- Visual journal
- Rubber cement
- Scissors
- Mod podge
- Paint brush
- Laser printed images
- Blue tissue paper
- Ripped up book page
- Black sharpie
HOW TO
Although this page may seem simple at first glance, this was a very long process. I decided I wanted to print pictures of all the supplies I ordered, and do a Mod Podge transfer directly on the book page of each item. This meant I had to plan ahead for what image would layer what, if dark colors would cover up lighter ones, and how many to do at once.
I started by printing out all of my pictures on a laser printer, a must for a successful Mod Podge transfer. I had to reverse all images that had text on them, Mod Podge transfers reverse the original image. I then cut each image out using scissors. Next, I began playing with placement. Because Mod Podge transfers create semi-transparent images, I had to be careful if any image overlapped. I had to place light colors together, and space out dark colors. Once I had my placement down, I began the Mod Podge transfer process.
First, you paint a layer of Mod Podge on the front of each image using a paintbrush. Allow the layer to fully dry. Paint a second coat, allow it to dry. Paint a third coat, and while the Mod Podge is still wet, place the image face down, and rub the back until it is completely stuck. After it dries on the page, wet the back of the image with water, and begin peeling off the white paper. The ink from the printer should stick to the Mod Podge, dried onto the book page, and all the white paper should come off. This creates transparent areas where there were light or white colors, and semi-transparent areas where it was dark.
Because I had to complete a transfer before layering another on top, I had to place images away from each other, finish them, allow them to dry, before putting the next image near them. It turned into a multi day visual journal page. When all the Mod Podge transfers were finally complete, I realized a lot of detail was lost, and a lot of the images blended together. To help bring the detail back in, I outlined certain images with black sharpie.
To finish the page I glued a strip of blue tissue paper with a strip of a book page on top of the background. I added the text using sharpie.
CHALLENGE
Create a visual journal page about a person who helped you through a tough situation or a pleasant surprise. Use at least one Mod Podge transfer in your page. Interested in teaching visual journals to your students? Check out my visual journal lesson plan here and bundle pack here. Check out more visual journal blog posts here. Shop my education resources here. Don’t forget to follow me on Instagram and TikTok for weekly visual journal demos. Until next time!





Leave a Reply