
Celebrate spring in your art classroom using a variety of styles, mediums, and techniques. Whether you’re teaching kindergarten or high school art, these spring art project ideas will engage your students and bring the spring season into your art classroom.
Check out these 9 engaging and educational spring art activities that encourage imagination, creativity, and skill-building!
1. Clay Dragonfly Project
Grade Level: Kindergarten through Lower Middle School
Medium: Clay
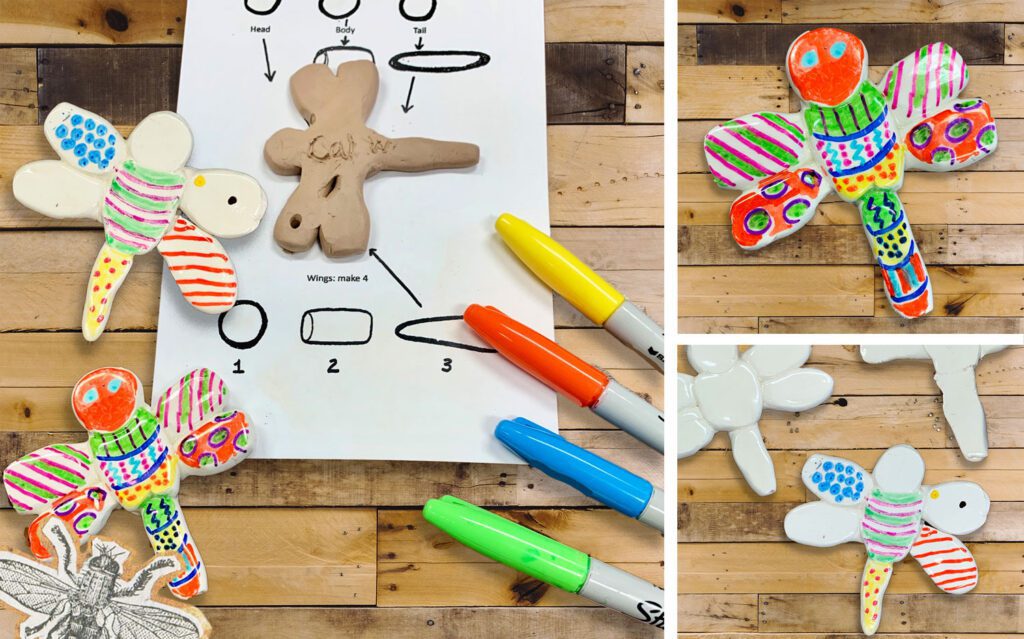
Introduce your younger students to basic clay techniques by creating whimsical clay dragonflies. This project uses spheres and fat coils to construct the dragonfly’s body and wings. It’s a perfect beginner clay project that can be adapted all the way through lower middle school art.
Supplies:
- White clay (air-dry or kiln-fired)
- Wire clay cutter
- Dragonfly template (printable)
- Pencils
- Clear glaze and brushes (kiln fired clay)
- Mod podge or acrylic medium and brushes (air dry clay)
- Sharpies for adding color (kiln fired clay)
- Paint pens for adding color (air dry clay)
- Optional: Thread or magnets for hanging
Steps:
- Roll and flatten clay spheres and fat coils to create the dragonfly’s head, body, and tail.
- Add raindrop-shaped coils for the wings, flatten, and attach by blending the clay.
- Blend the entire back of the clay to create a solid structure, flip it over and you can still see the sphere and coil design on the front!
- Air dry your clay and kiln fire if you have access to a kiln.
- Once dry, bisque fire your clay, add a coat of clear glaze and fire again.
- Use sharpies to decorate on top of the clear glaze. If using air dry clay decore using paint pens and seal with mod podge or acrylic medium.
- Optional: Add magnets to the back for a functional display piece.
Pro Tip: Allow two weeks between construction and glazing to allow ample drying time and for absent students to catch up.
You can hit the easy button and get this lesson drop-in-reay from my TPT shop here.

2. Paper Chick Sculpture
Grade Level: Kindergarten through 3rd Grade
Medium: Construction Paper
This adorable spring art project idea teaches young students how to turn a 2D design into a 3D paper sculpture. The chick’s interactive beak opens and closes, providing a fun, hands-on experience that blends creativity with basic sculpture concepts.
Supplies:
- Construction paper or heavy drawing paper
- Scissors and glue
- Markers, crayons, or colored pencils
- Optional: Glitter, sequins, and feathers for decoration
Steps:
- Fold, cut, and shape the paper to create a chick’s body.
- Create and fold a beak that opens and closes by folding the paper in half, cutting a slit in the paper, folding the paper up into a triangle and down into a triangle.
- Fold the paper in the opposite direction and push the folded triangles out to create a beak.
- Add fun details such as eyes, feet, and decorative elements.
Pro Tip: Encourage students to explore different chick shapes and colors to enhance creativity.
Get everything you need to teach this project here!
3. Spring Landscape Drawing with Depth
Grade Level: Upper Elementary
Medium: Crayons, Markers, or Colored Pencils
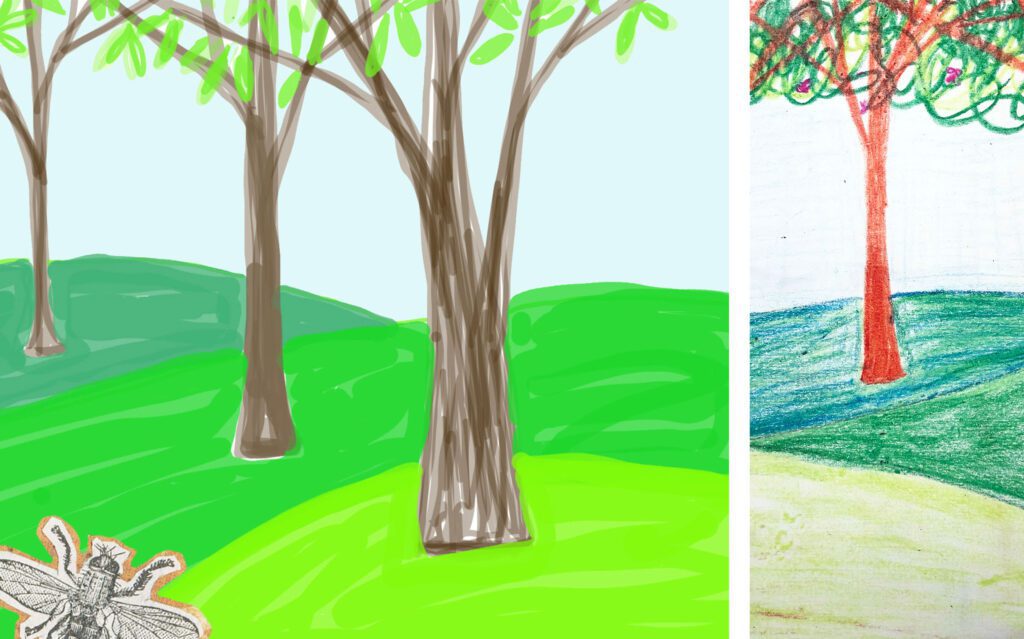
Teach your students about atmospheric perspective and depth with this spring landscape drawing. By using size, placement, and color variations, students create realistic springtime landscapes with blooming trees and hills.
Supplies:
- White or light blue drawing paper
- Crayons, markers, or colored pencils
Steps:
- Draw 2-3 trees of varying sizes at different heights to create depth.
- Don’t draw the trees on the bottom edge of the paper, the lowest tree should be about an inch above the bottom edge.
- Add overlapping hills in different shades of green to show distance. Place one hill behind each tree.
- To create an atmospheric perspective look use lighter colors in the foreground and darker colors in the background.
- Add a blue sky and optional clouds with crayons.
Hit the easy button and get everything you need to teach this project (minus the supplies) here.

4. Spring Op Art Activities
Engage your students with quick activities with fun results. These optical illusions provide a base understanding of animation by showing how flipping between 2 pictures can make it seem like the picture is changing and moving. Check out the details below.
Flip Pictures
Grade Level: Elementary and Middle School
Medium: Pencil and Paper
Introduce your students to optical illusions with spring flip pictures that magically change between two images! This fun activity encourages creativity while teaching basic animation principles.
Supplies:
- Strips of lightweight copy paper (3” x 8.5”)
- Pencils, markers, and erasers
Steps:
- Fold your long sheet of paper in half.
- Draw two related spring-themed pictures, such as a flower blooming or a bird hatching.
- Draw the image on the bottom page first.
- Hold the paper up to a window or place on a light table, trace the bottom image on the top page.
- Erase and make changes to the drawing on top.
- Roll the top paper around a pencil.
- Slide the pencil up and down to push the top paper down and pull it up, watch as the drawing appears to move on it’s own!
Fill-in-the-Blank Spring Animation
Grade Level: Elementary and Middle School
Medium: Pencils and Paper
This spring art project idea combines drawing and animation by having students complete a “fill-in-the-blank” scene with seasonal transformations.
Supplies:
- Lightweight white drawing paper (4” square)
- Markers and pencils
- Drinking straws and tape
Steps:
- Draw the first part of the design (e.g., an empty bird’s nest or a bare tree) on one side of the paper.
- Flip the paper and draw the transformed version (e.g., baby birds or blooming leaves), this should be placed above, below, or inside your first drawing on the back of the paper.
- TIP: Hold your paper up to a window or place it on a light table to help see the drawing through the paper to place your second drawing.
- Attach the paper to a straw and flip the drawing back and forth to animate the transformation.
Pro Tip: Challenge students to brainstorm other springtime changes they can animate!
Grab these two activities in one spring lesson pack here.
5. Dragonfly Wax Resist Spring Art Project
Grade Level: Elementary and Middle School
Medium: Crayons and Watercolor
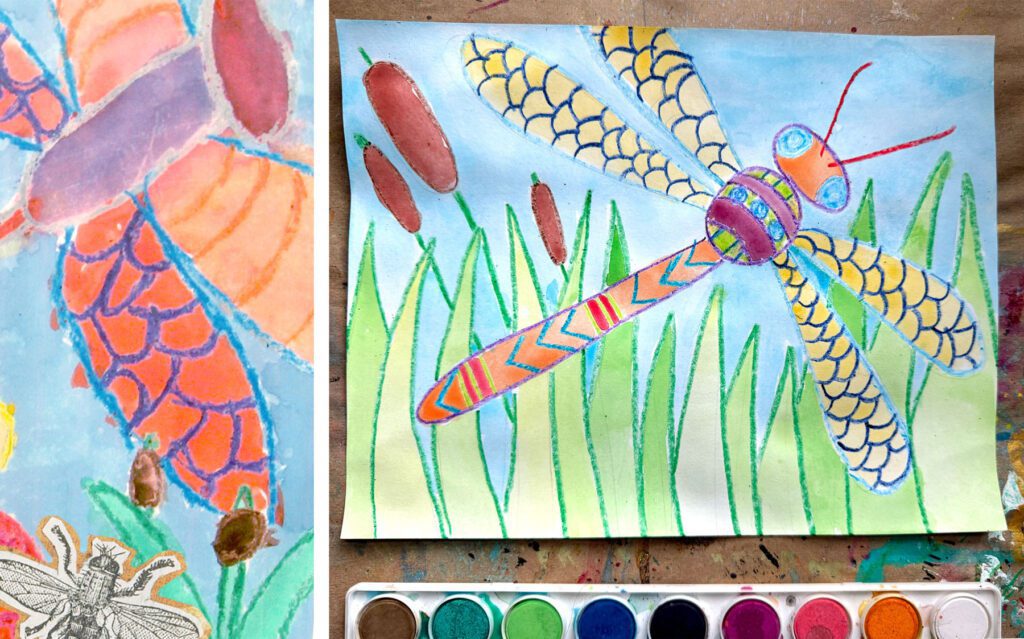
Explore mixed media by creating patterned dragonfly scenes using wax resist. Students draw detailed dragonflies with crayons and enhance them with vibrant watercolor backgrounds.
Supplies:
- Heavy drawing paper (9”x12”)
- Crayons
- Watercolor paints and brushes
Steps:
- Draw a dragonfly using geometric shapes.
- Fill the dragonfly with intricate patterns using crayons.
- Paint watercolor in big areas to reveal the resist effect.
Pro Tip: Encourage students to add spring-themed details like flowers, grass, and cattails.
Hit the easy button and get everything you need to teach this project (including a demo video) here.

6. Flowerpot Scratch Foam Print
Grade Level: Elementary through Middle School
Medium: Scratch Foam, Printmaking
Celebrate blooming flowers with a spring-themed scratch foam print! Students create unique flowerpot designs that highlight overlapping, placement, and pattern.
Supplies:
- Scratch foam board (4”x6”)
- Pencils
- White block printing ink
- Acrylic sheet for rolling ink
- Soft rubber brayer
- Construction paper
- Colored pencils
Steps:
- Draw the flowerpot design on paper
- Tape your design on top of the scratch foam.
- Trace over the design to press it into the scratch foam.
- Trace over your lines as needed to make the lines deep.
- Roll white ink over your design using a brayer.
- Lay a piece of construction paper on top, press on the scratch foam.
- Lift the paper to reveal the print!
- I let the print dry.
- Add vibrant colors to the finished print using colored pencils.
Pro Tip: Remind students to press firmly when transferring the design for crisp, clean prints.
You can get everything you need to teach this project on my website here.
7. Marbleized Bug Card
Grade Level: Elementary, Middle, and High School
Medium: Shaving Cream Prints, Maker Drawings
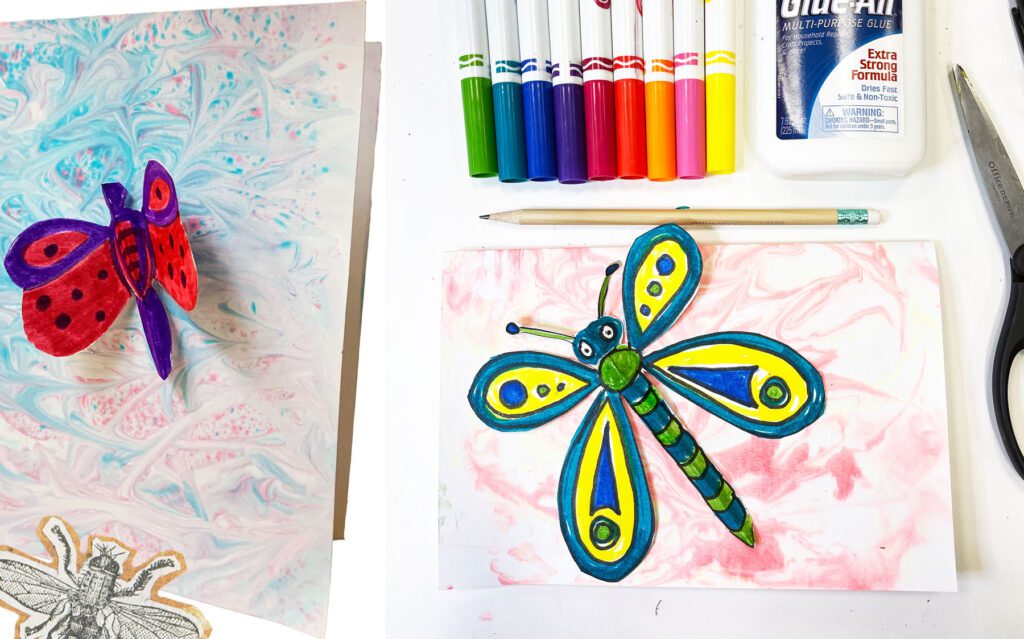
Create beautiful marbled paper backgrounds and add colorful bug designs to create unique, dimensional spring cards.
Supplies:
- Shaving cream
- Liquid watercolors
- Heavy paper or cardstock
- Pencils
- Scissors
- Glue
- Markers
Steps:
- Swirl watercolor in shaving cream to create a marbled effect.
- Press paper onto the surface and lift.
- Scrape the shaving cream off the paper to reveal the print.
- Let the paper dry.
- Fold the dried paper into a card.
- Design a bug or butterfly on a separate sheet of paper, and add color using markers.
- Cut out the bug design.
- Glue it to the front of the marbled paper card.
Pro Tip: Use this project for Mother’s Day or Earth Day by incorporating messages of love and sustainability.
You can get everything you need to teach this spring art project (with step-by-step instructions and a demo video) in my TPT shop here.

8. Pysanky Egg Design:
Celebrate the birth of new life in spring with a non-religious egg decorating project. Explore pysanky eggs, a traditional egg decorating art form from Ukraine, and create pysanky-inspired egg drawings. This project can be introduced as early as elementary and adapted to be more complex for intro-level high school art classes.
Supplies:
- Large egg or ball with a line drawn around the middle
- White drawing paper
- Water-soluble wide-tip markers: red and blue
- Wide paintbrushes
- Containers of water
- Scissors
- Optional: glue and construction paper
For Older Students: - Pencil
- Eraser
- Color materials such as markers, paint pens, crayons, or colored pencils
- Optional: glue and construction paper
Steps:
- Introduction:
- Discuss how a straight line appears curved when drawn on a rounded surface.
- Hold the egg/ball at different angles to demonstrate how the line changes:
- Above eye level: Ask if the line looks straight or curved. It should look like a “frown,” like the face you make when an egg falls!
- Below eye level: Ask again. This time, it looks like a “smile,” like finding a beautiful egg in the grass.
- Demonstrate how to paint gently to prevent over-blending or washing away color.
- Create Egg Designs:
- Distribute supplies.
- Students will:
- Write their name on the paper.
- Trace egg patterns onto the paper.
- Draw curving lines across the egg to create sections (like smiles).
- Fill each section with patterns using both red and blue markers. Add slightly less blue since it’s a darker color.
- Paint Over the Patterns:
- Once the patterns are complete:
- Students take their drawings to the painting area.
- Dip the brush in water, gently wipe off excess water, and paint over the egg designs.
- Blend colors carefully to create a soft watercolor effect.
- Once the patterns are complete:
- Dry and Clean Up:
- Carry wet paintings to the drying rack.
- If time permits:
- Draw curved lines on shapes like bottles or vases to practice making objects look rounded.
- Complete optional activities like a primary and secondary colors worksheet or design a beach ball with curved lines.
- Have students clean up during the last few minutes of class.
Read even more details on this project in a blog post here or get the lesson pack here.
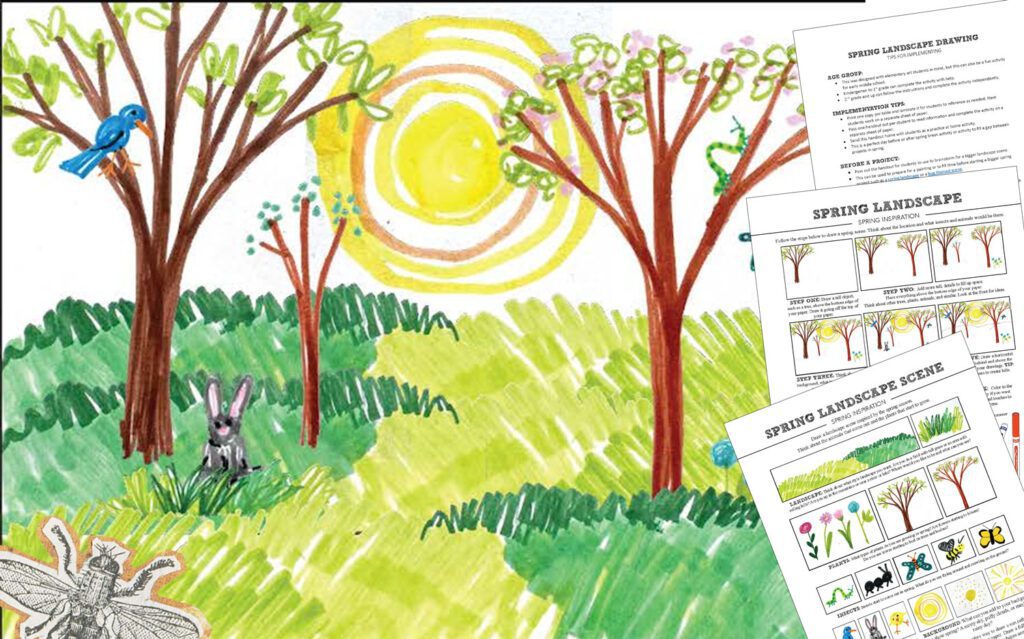
9. Spring Landscape Directed Drawing:
If you need an art sub plan, early finisher art activity, or a quick one-day art activity, this spring landscape drawing is a perfect choice. Engage students in creating a vibrant spring-inspired landscape scene by following a directed drawing guide.
Supplies:
- Paper
- Pencil
- Eraser
- Colored pencils, crayons, or markers
Steps:
- Draw their design on a separate sheet of paper.
- Follow the steps to add details and create depth in the landscape.
- If finished early, work on a second drawing featuring a different spring landscape or location.
- Add color using crayons, markers, or colored pencils.
- Encourage creativity by adding imaginative details to their spring landscapes.
Tips for Success:
- Fill the Space: Encourage students to fill the paper with their scene. At least one object should extend beyond the top of the paper.
- Layer the Drawings: Place all objects above the bottom edge of the paper. Nothing should “sit” on the bottom edge of the paper.
- Add Spring Details: Consider spring weather, plants, insects, and animals that might be present in the scene.
Get the handout, teacher notes, and sub plans for this activity here.
Celebrate Spring with Creativity!
These 9 spring art project ideas offer something for every grade level and ability, ensuring that all your students can explore their creativity while learning valuable artistic skills. Whether it’s introducing young learners to clay or challenging older students with printmaking, these projects help celebrate art and the spring season.
Which project will you try first? Let the springtime creativity begin! 🌸🎨
Looking for one-day art activities for before or after spring break? Check out another blog post here!
Don’t forget to follow me on Instagram and TikTok (I have a few tutorials of these one-day art projects already in my feeds) for weekly visual journal demos and other project ideas. Subscribe here to get freebies, project tutorials, and more straight to your inbox. Until next time!

0 Comments