Holiday Art Projects for Elementary Students: Creative Ways to Wrap Up the Year
The weeks leading up to winter break can be one of the most challenging times of the year to teach. The excitement of the holiday season makes it difficult to keep elementary art students focused in the classroom. But there’s a way to harness that holiday excitement and channel it into engaging, educational, and creative holiday art projects.
In this blog post, I’ll cover several easy-to-execute yet fun holiday art projects for elementary art students. Whether you have just one day to fill or a little more time to dive deeper into a project, these activities will not only get your students excited about art, but also give them a chance to express themselves, create gifts, and celebrate the winter season. Check out details below!
One-Day Holiday Art Projects
If you are looking to fill the week or days leading up to holiday break, these are the art lessons for you. These art activities are designed to be fun and fit into one class.
Snowflake Cut-Outs and Stencils
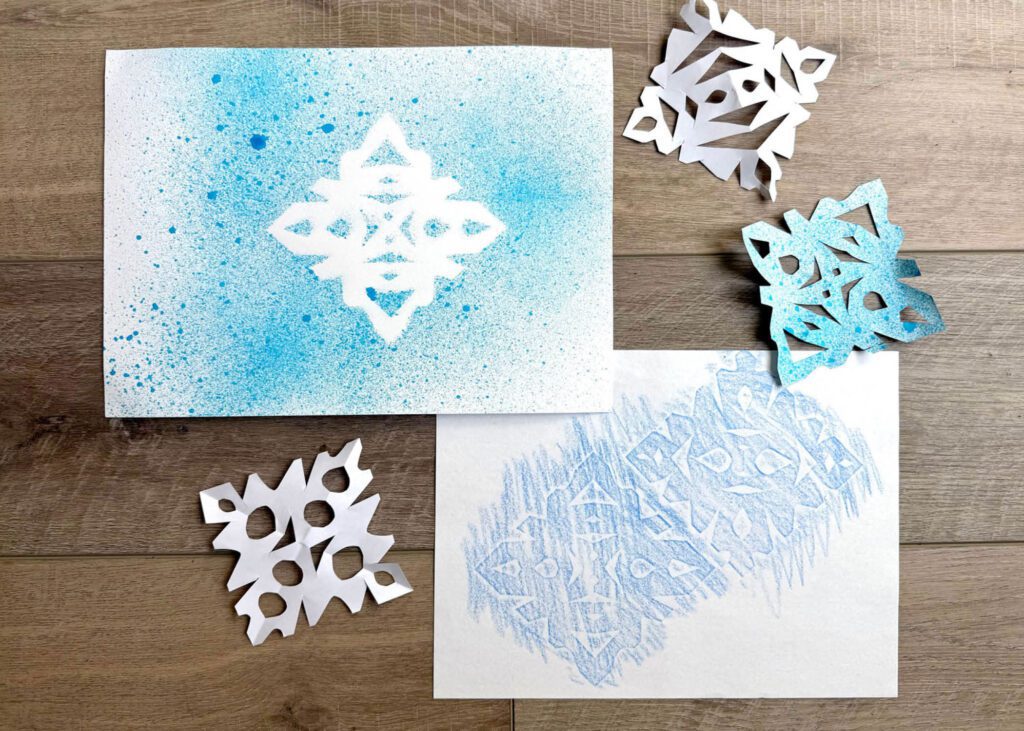
One of the best ways to capture the magic of winter is through snowflakes. This winter art activity can be broken down into three parts: cutting snowflakes, creating stenciled designs, and making rubbings. This can function as an art stations day or have students work at their tables on snowflake cutting and rubbings and come one at a time to the stencil spray table.
Supplies Needed:
- Squares of white paper (medium-weight paper works best)
- Scissors
- Pencils
- A large sheet of heavy white paper
- Thin white paper for rubbings
- Liquid watercolor in turquoise (diluted)
- Refillable fine spray bottle
- Dark crayons or crayons with peeled paper
- Small boxes for collecting trash
How to Do It:
- Cutting Snowflakes: Start by teaching students how to fold their paper into a triangles and cut out snowflakes. Remind them that folding the paper twice makes the cutting process easier, any more folds can make it hard to cut. They can’t cut the fold edges off or their snowflake will fall apart, leave space between cut shapes.
- Stencil Art: Once students have their snowflakes, they’ll use them to create stenciled designs. Each student will place their favorite cut snowflake in the center of a larger piece of paper and spray it with the blue watercolor. Older students can spray it themselves, but younger students may need supervision. This is a great lesson to discuss positive and negative space.
- Rubbing Technique: Lay a thin sheet of paper over a one or two cut snowflakes and rub it with the side of a crayon to reveal the snowflake’s design. This is a great lesson to discuss actual and implied texture.
Bonus Tip: This lesson is perfect for learning about the work of Wilson Bentley who photographed snowflakes in incredible detail. You can read the story of his life in the book, Snowflake Bentley, to inspire students during the project.
Get the full lesson plan and demo video here!
Nutcracker Art Project
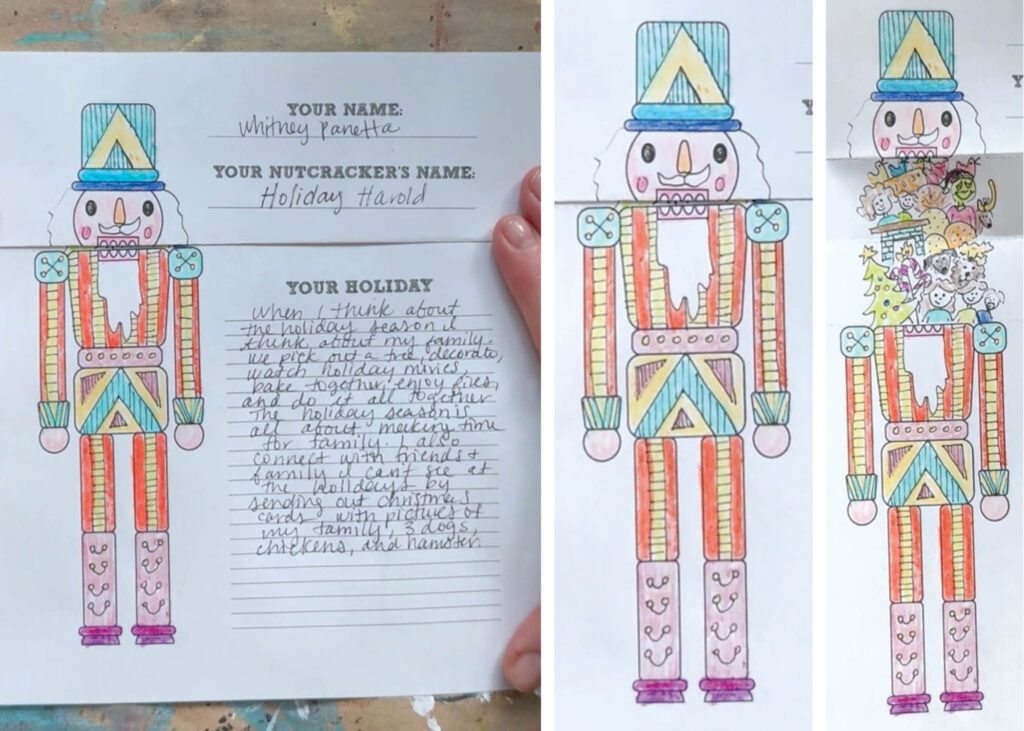
This quick holiday art project combines design, personal reflection, and creativity in a very festive activity. The nutcracker craft can be a great way to incorporate the holiday season while giving students a chance to express their traditions and interests.
Supplies Needed:
- White paper or nutcracker handout
- Pencil, eraser
- Thin black markers
- Crayons, colored pencils, or markers
How to Do It:
- Design the Nutcracker: If using the handout have students fold along the dashed lines. Keep the paper folded as they add details and patterns to their nutcracker. Review how lines, shapes, and colors repeat to create patterns. If your students are creating the nutcracker on blank paper have them fold the top 1/3 of the paper and draw the nutcracker on top. Place the head of the nutcracker above the fold line and the body below the fold line.
- Add a Surprise Inside: The nutcracker is folded in a way that when you open the fold, the mouth appears to “open” as well, revealing a surprise design inside. Make sure students focus on only drawing inside the fold to ensure the surprise is a true surprise! Have students create drawings of their favorite part of the holiday season and their family traditions this time of year.
- Writing: Once students finish their design have them write about their holiday season and traditions. This is a great way to tie in ELA for a cross-curricular lesson and impress your admins.
This project allows for a wonderful discussion about the different ways people celebrate the holidays, and students can make connections between art and cultural traditions.
Find the full lesson and demo video here!
Pop-Up Cards: Holiday Greetings with a Creative Twist
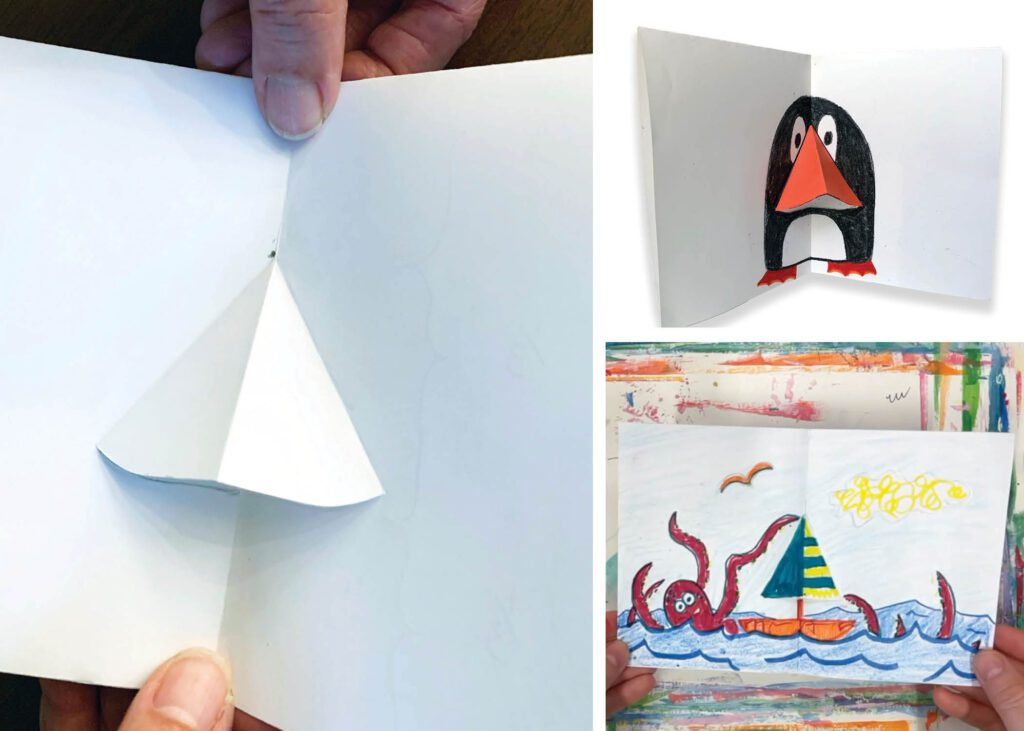
Pop-up cards are a fantastic way for elementary art students to make personalized, three-dimensional holiday cards to share with loved ones. The triangle shape is simple to create and can be turned into a Christmas tree or other designs such as an ice cream cone, hat, or whatever else the students come up with. This is the perfect last art lesson before break because it’s low supply, simple, and students can take them home the same day.
Supplies Needed:
- Copy paper or drawing paper
- Scissors, pencils, erasers
- Crayons, colored pencils, or markers
- Optional: glitter, sequins, and glue for extra decoration
How to Do It:
- Introduction to Relief Art: Begin by introducing the concept of relief art. Ask students if they can identify relief on a coin (such as the raised image of George Washington’s head). Show them examples of relief sculptures and discuss how the raised portions of the artwork are attached to the background. This is a great introduction to form and sculpture.
- Create the Pop-Up: Demonstrate how to fold the paper in half, then cut along a curved line to create a triangle shape that will pop up when the card is opened. Show how to fold the card so the triangle stands up when folded and pop out when opened. Let students personalize their pop-up shapes (e.g., a Christmas tree, a hat, or a snowman).
- Decorating: Once students have their basic shape, they can color, decorate, and add personal touches to make their card unique. Encourage them to think about what they would like to say or send to someone as a holiday greeting.
Pop-up cards are an easy way to teach students about form and sculpture in art, and they can create a fun holiday keepsake for friends and family.
Find the full lesson and demo video here!
IF YOU HAVE 2 OR MORE WEEKS:
If you have a bit more time, consider tackling a longer project that involves more materials or a project that students can give as a gift to a loved one for the holidays.
WAX RESIST SNOWMAN:
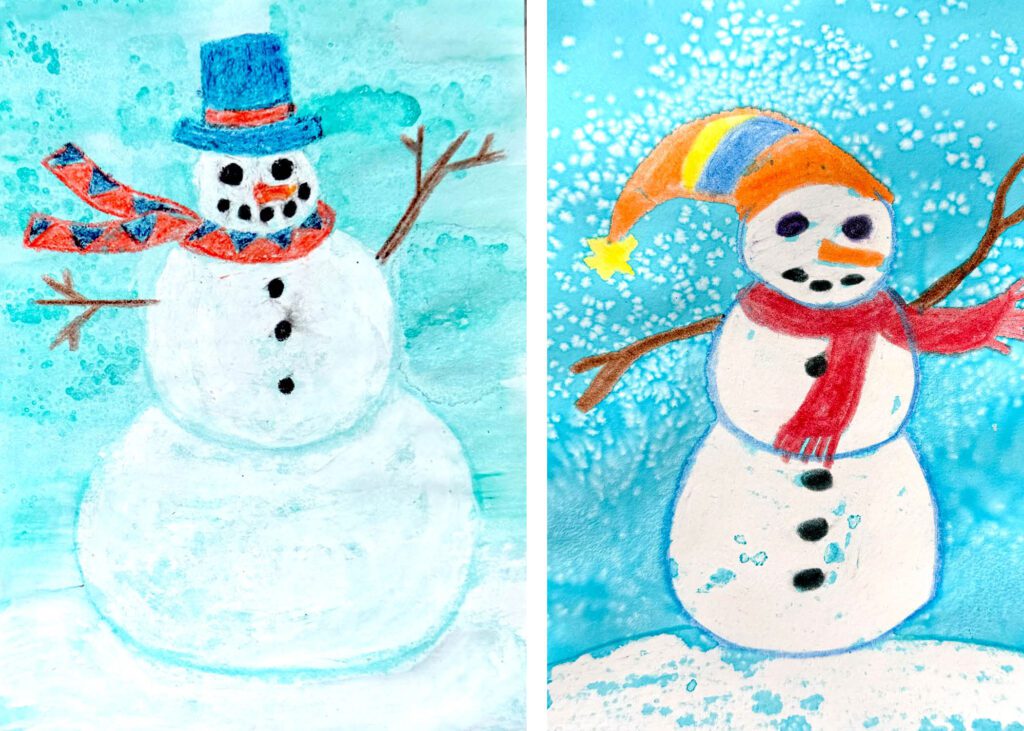
This project is perfect for kindergarten and older students. It combines mixed media, wax resist, and the fun technique of using salt to create a snowy effect for a snowman scene. I like to incorporate Olaf and other snowman-themed books for inspiration. The magic happens as students watch the watercolor resist the waxy crayons and create a snowy effect with the addition of salt. It’s also a great project for January if you run out of time before the holidays.
Supplies:
- White heavy drawing paper (6” x 9”)
- White crayons (one per student)
- Crayons in assorted colors
- Scrap paper (larger than drawing paper)
- Turquoise liquid watercolor paint (slightly diluted)
- Large flat brushes (1” wide)
- Salt in shakers (3-4 for the painting table)
Day 1: Project Introduction:
- Introduce the project through a presentation or demo.
- Read aloud Snowmen All Year (or show the read-aloud video) and discuss the details of snowman clothing, facial features, and patterns.
- Demonstrate how to draw a snowman using a light blue crayon:
- Draw 3 overlapping circles (head, middle, and bottom).
- Add arms, features, and clothing (scarves, mittens, etc.).
- Color in several layers with medium pressure and use white crayon to color around the features.
- Distribute supplies and have students start by drawing and coloring their snowman.
Day 2: Project Wrap-Up:
- Set up a painting table with turquoise liquid watercolor paint, large brushes, scrap paper, and salt shakers.
- Review vocabulary and steps for the painting process.
- Demonstrate painting:
- Use a brush to quickly paint the entire background, starting and ending beyond the edges of the paper.
- Immediately sprinkle salt onto the wet paint to create a snowy effect.
- Carry the painting to the drying rack.
- Have students finish their snowman drawings and start a new snowman drawing while others work at the painting table.
Get everything you need to teach this project, including a demo video, here.
SNOWY LANDSCAPE:
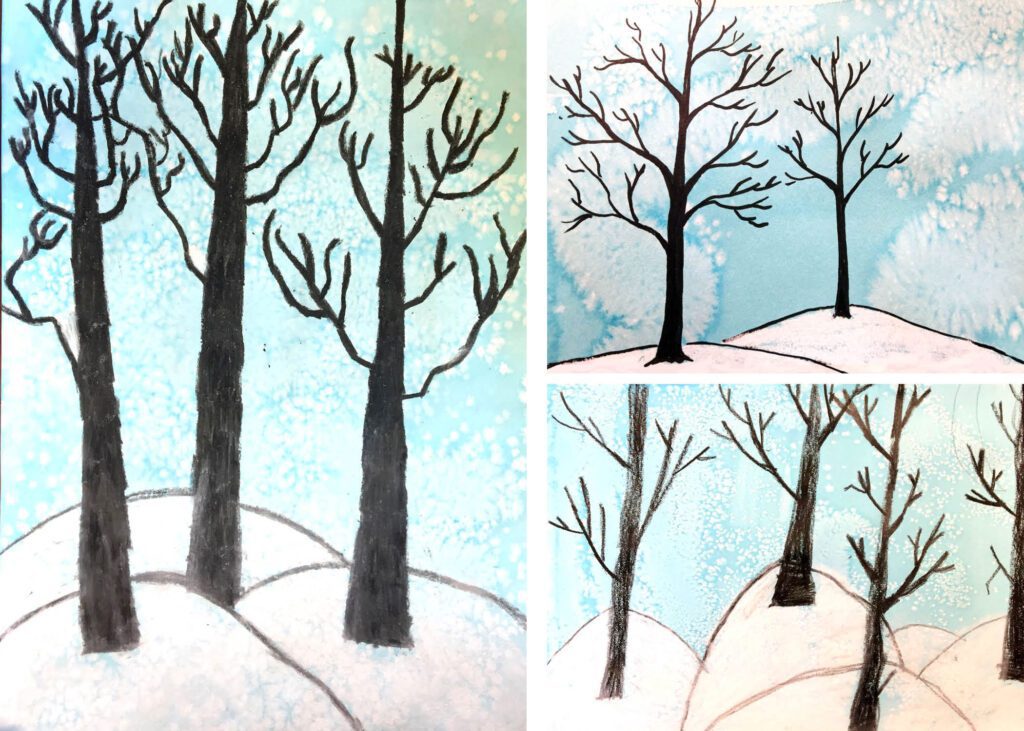
For older elementary or middle school students, I recommend the Snowy Landscape project. This project builds on the salt technique used in the snowman project but introduces new concepts like overlapping, landscape art, and composition. It’s can create a beautiful gift for a loved own if it’s completed before the holidays or use it to start second semester in January.
Supplies:
- Practice drawing paper
- 9×12 heavy white drawing paper
- 12×18 paper (scrap paper works)
- Liquid watercolor (turquoise blue)
- Wide paint brushes (1”)
- Salt in shakers (4-6)
- Paper towels
- Black crayons
- White chalk
Day 1: Introduction, Practice Drawing Trees, and Paint Paper:
- Introduce the project and demonstrate a tree drawing.
- Students will start by painting their background and add the tree scene next class.
- Demonstrate the painting process, ensuring students paint quickly and evenly across the paper.
- Sprinkle salt onto wet paint for the snowy effect.
- Once students complete the painting, they will carry their painted paper to the drying rack.
- Students will practice drawing trees on the practice paper while they wait their turn.
Day 2: Tree Drawing and Adding Snowy Effects:
- Once the paintings are dry, students will remove salt by gently rubbing paper towels on the painted surface.
- Demonstrate how to draw trees on the painted, dry paper using a black crayon.
- Add snow-covered hills using chalk to create a snowy landscape effect.
- Have students complete their trees and hills with chalk and crayon.
Get everything you need to teach this project, including a demo video, here.
CLAY PICTURE FRAME:
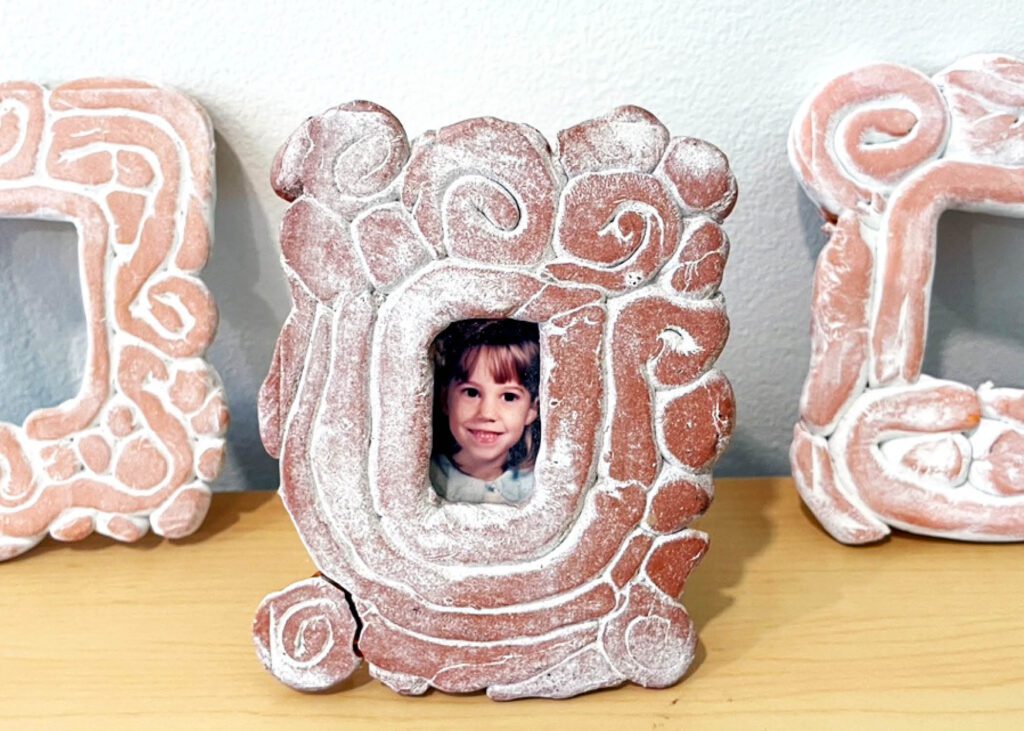
This is one of my favorite projects because students create a sentimental gift perfect for the holiday season! Work with classroom teachers to gather student pictures, or use school photos, to personalize the frames. On the last day before the break, students can decorate a gift bag and include a pop-up card with their gift. It’s an the best holiday art project at any grade level.
Supplies:
- Terra cotta or white clay (for colored glazes)
- Wire cutter
- Clay construction worksheets
- Pencils
- Drawing paper
- Paint brushes
- Clear glaze or diluted tempera paint
- Scrap paper (9×12 or half sheets)
- Damp paper towels
- Thin cardboard or poster board (cut to frame sizes)
- Hot glue gun and glue sticks
- Printed student pictures (sized to 2.25” x 1.75”)
Day 1: Make a Clay Frame:
- Demonstrate how to make a coil frame using clay. Show how to roll coils, form spirals, and fill spaces with clay balls or flat pieces.
- Students will create their frames by rolling coils and placing them on their worksheet templates, then smoothing and joining coils.
- After the frames are complete, students will write their initials and carry their clay to the drying area.
Day 2: Paint Frames:
- After bisque firing, distribute the dried clay frames to students.
- Students will paint the frames with diluted, white tempera paint and wipe it off, leaving paint in the crevices of the coils.
- The completed frames will be given back to students with their personalized photos, ready to be gifted.
Get everything you need to teach this project, including a demo video, here.
Extra Tips for Success in Your Elementary Art Classroom
– Keep It Simple: Sometimes the best projects are the simplest ones. These holiday art projects focus on fundamental skills like cutting, folding, coloring, and stenciling, which are appropriate for elementary students and can be modified based on age and skill level.
– Set Up Stations for Large Classes: If you’re teaching a large group, consider setting up activity stations where students can rotate through different tasks. For example, set up a cutting station, a stenciling station, and a coloring station. This will help keep the class moving and ensure that every student gets hands-on experience with each part of the project.
– Engage with Storytelling: Many holiday art projects, such as the Nutcracker craft, offer an opportunity to tie in a holiday story or legend. Incorporating reading into your projects gives students more examples and brings an ELA tie in.
– Make It Personal: Encourage your students to think about their own holiday traditions or special memories into their projects. This allows them to make the artwork more meaningful and gives them a personal connection to the process.
– Use Tech: If you have limited time or students who miss class, a demo video can be a lifesaver. You can play the video to quickly explain the steps or even use it as a sub plan. The videos allow for a consistent teaching approach, ensuring every student gets the same instructions, even when you’re not available.
Wrap Up the Year with Creative Holiday Art Projects
The holiday season is a perfect time to engage your elementary students in art projects that tap into their creativity and excitement. Whether you’re cutting snowflakes, designing nutcrackers, or making pop-up cards, these activities provide students with a chance to unwind before the winter break while learning valuable artistic skills.
Good Luck Surviving the Chaos!
Don’t forget to follow me on Instagram and TikTok (I have a few tutorials of many of these projects already in my feeds) for weekly visual journal demos and other project ideas. Subscribe here to get freebies, project tutorials, and more straight to your inbox. Until next time!
0 Comments