Setting up a public classroom art display is the best promotion for an art department. Find an empty wall in your school, ideally in communal gathering spaces such as the lobby or main hallways, and regularly swap out artwork. Although putting up art classroom displays can be time-consuming, it’s a great way to show students, parents, and administrators the amazing things you are doing in your visual art room. There are many different ways to display artwork in your classroom environment!
BUDGET CLASSROOM ART DISPLAYS
If you are working on a budget, skip the matboard. It saves time and money to simply mount 2D artwork on black construction paper. I purchase a large roll of black kraft paper, and it lasts years. Simply cut the paper, adding 2″ to the width and height of the artwork you are mounting. Center the artwork and tape it down.
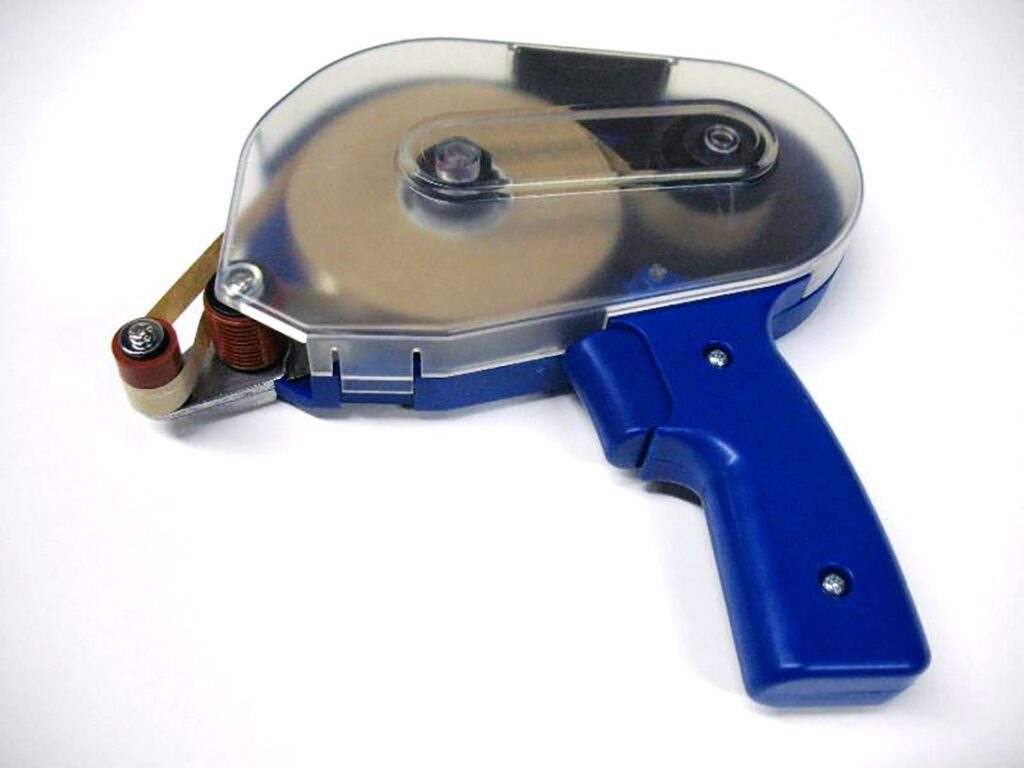
If you splurge on anything, splurge on a double-sided tape gun. This will save you so much time mounting artwork. Add a few strips of tape to the back of the artwork and slap it down on your mounting paper. In all the years I taught high school art, I never had a parent or student complain about artwork being taped down. I typically handed back artwork still mounted, but, you can carefully remove the artwork from the paper. Slowly peel the artwork up, the paper will likely rip and stick to the double-sided tape on the back. This prevents it from sticking to anything else, and you will never see it.
CINDER BLOCK WALLS
At a previous school, I had to display work on painted cinder block classroom walls. It’s incredibly difficult to display on these walls, tape won’t stick long-term and you can’t nail into it. If your admin team will allow it, hot glue is the way to go. I would place a piece of clear packaging tape on the back of the student artwork, on all four corners. Add a dot of hot glue on top of the packaging tape, then pressed it to the wall.
The artwork is easy to peel off the wall, I never had issues peeling the hot glue from the cinder block wall and rarely had paint come off with it. If the hot glue sticks to the artwork, it’s easy to peel off the clear packaging tape without hurting the artwork. TIP: keep a pint of wall paint on hand to touch up as needed. Or cover up the paint spot with new artwork displays and patch the wall at the end of the school year.
BUDGET HANGING SYSTEM
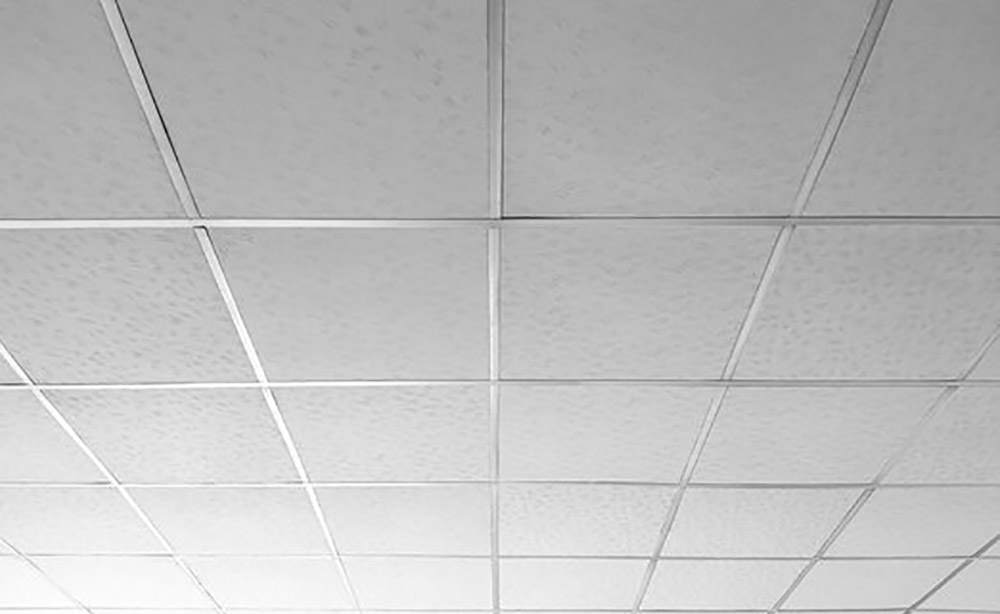
If you aren’t allowed to hang on the walls of your school, you may be able to hang from your ceiling. If you have tile ceilings, use paper clips to hook over the metal bars in between the tiles. Go as close to the wall as possible. Run string or wire down from the paper clip to eye level. Tape or hot glue artwork to the strings. For a larger art piece, attach it to two spaced-out strings to stabilize the artwork. This is the perfect addition to any art classroom, and it works best with light works of art.
FANCY DISPLAY BOARDS
VELCRO DISPLAYS
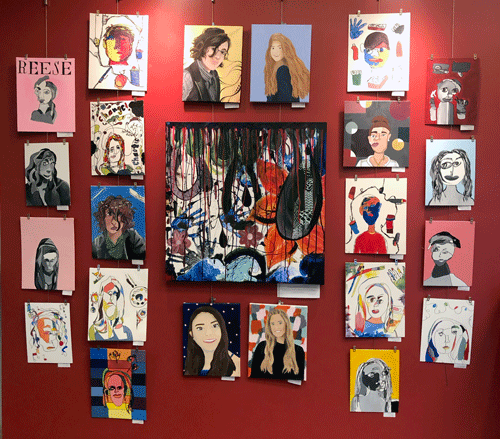
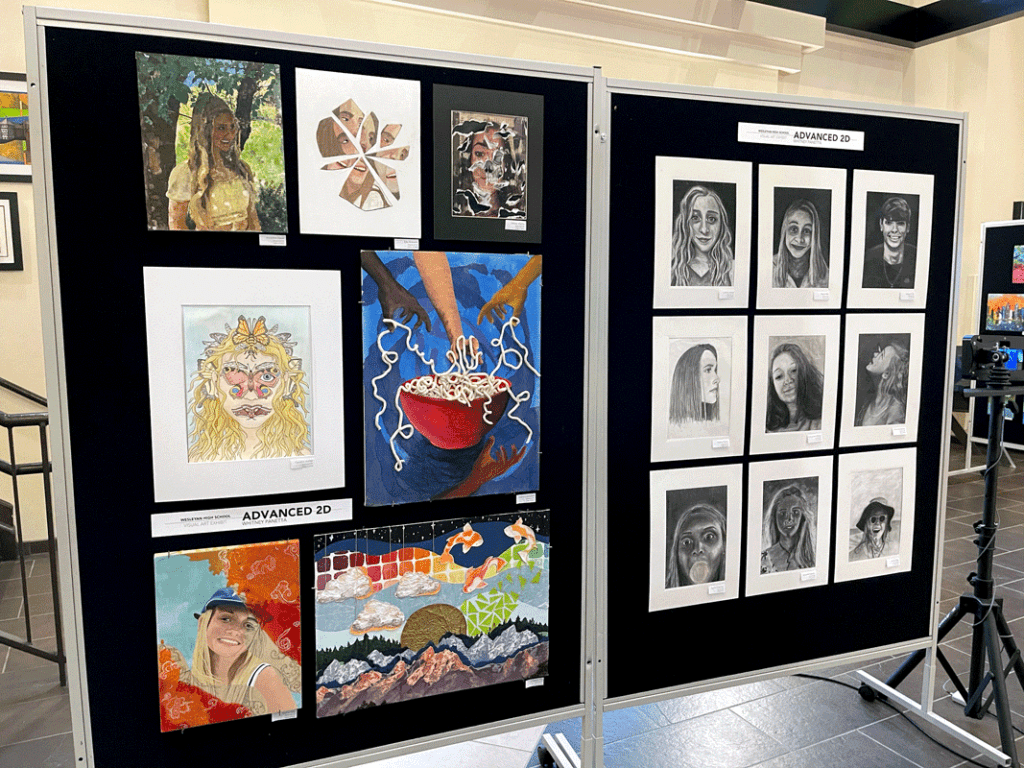
If you have a larger budget to work with these mobile display boards are a game changer. During the school year, I used one or two panels on wheels to take art displays to various locations around campus. Every spring every board is pulled out and set up to display artwork for our annual art show. Artwork from every middle and high schooler who took art that year is displayed. It creates a gallery-style exhibit and is incredibly easy to use velcro dots and t-pins to display artwork.
These panels pre-date my joining the school, but similar panels can be found here and here. The panels came with legs and wheels, which is perfect for creating mobile and non-mobile displays.
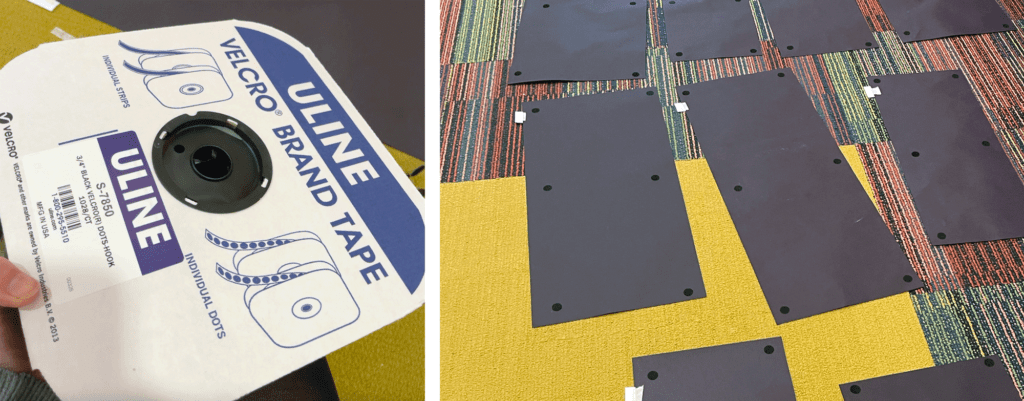
If you have fabric bulletin boards or the panels I reference above, velcro dots are your best friend. Our boards have a “loop” style fabric. This allows the rough side of velcro, or the hook side, to stick to it. At the start of every school year, my art department stocks up on the hook velcro dots. You can’t find them cheaper than Uline. You simply stick the velcro dot to the four corners of a work of art and stick it to the board. It’s so easy to move artwork around and reorganize using these velcro dots. This is hands down one of my favorite and most creative ways to display children’s artwork.
HANGING DISPLAYS
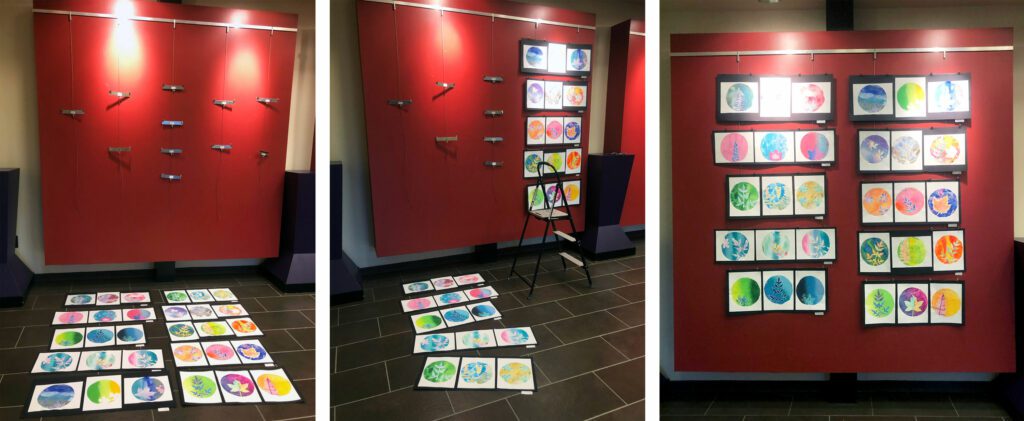
There were many walls at my school we weren’t allowed to nail into. To work around this, we put up multiple hanging display systems. A bar was added to the top of the wall where wire or bar hangers were attached. This allowed very flexible student work display spaces. With the variety of clips, bars, and hooks we could hang paper, canvases, and even framed artwork.
We ordered through Walker Systems, they were a great option for this type of wall space!
CLASSROOM ART DISPLAY TIPS
To create a classroom art display wall that looks aesthetically pleasing and informative make sure you include the following:
- Title of the project
- Project explanation
- Student labels
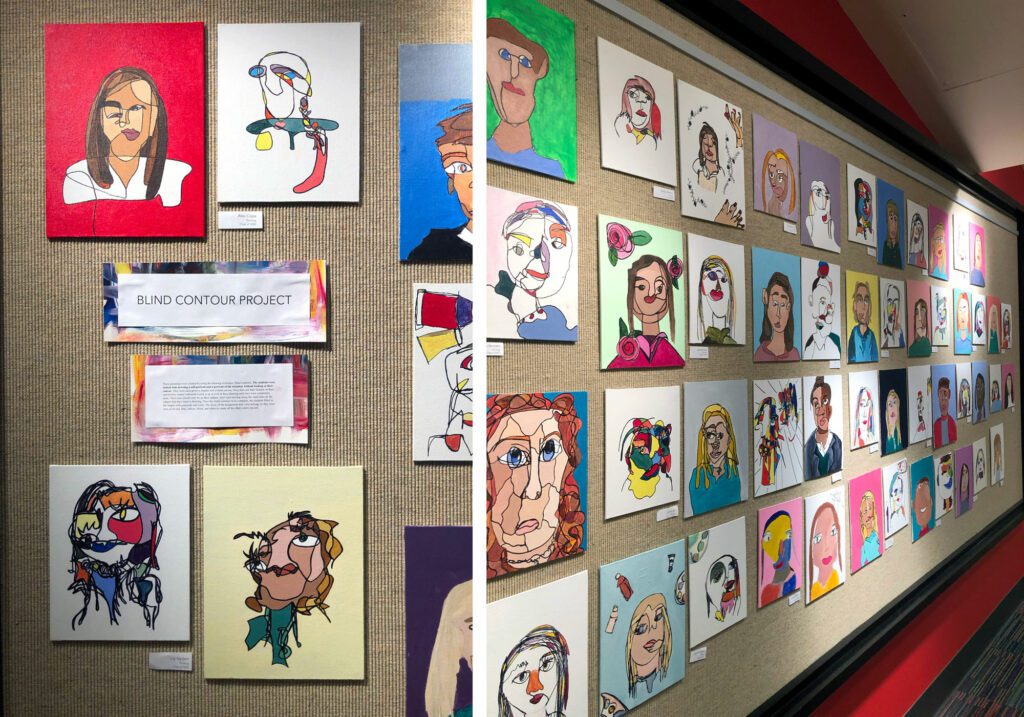
This will provide students, administrators, and parents with information about the assignment as well as who made which work of art. My student labels always had the student’s name, grade, and for advanced classes, the title of their artwork. I always create student labels early. Print and cut multiple copies to make it easier when it comes time to display children’s work.
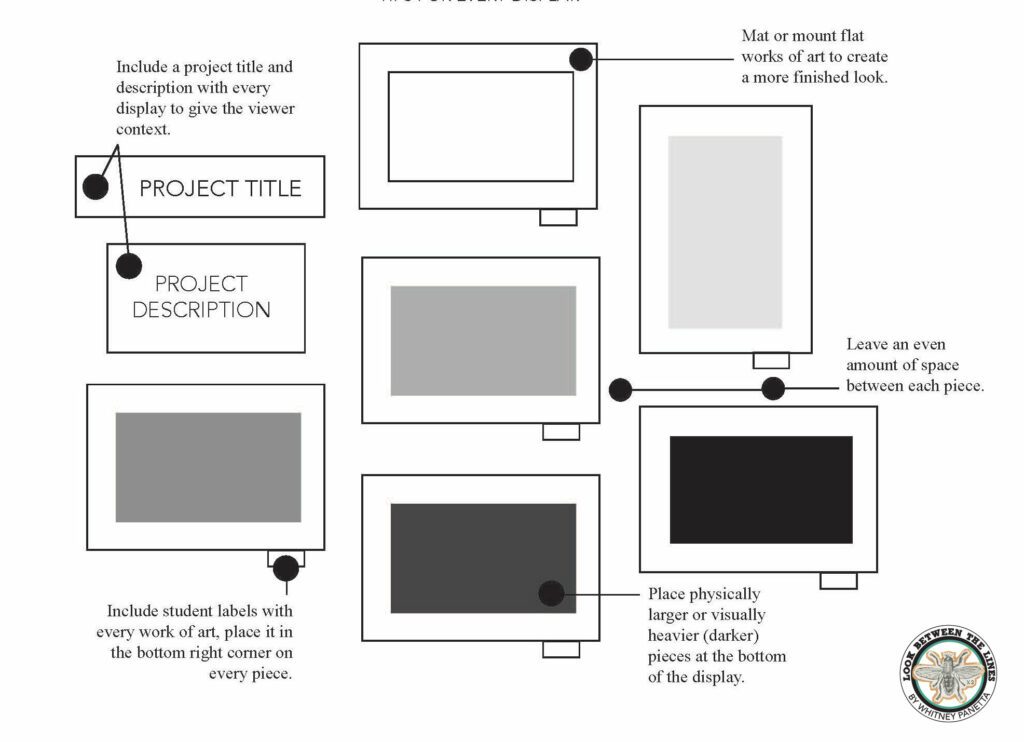
Pay attention to how you arrange the artwork. I prefer a cluster or diamond-style display, with larger pieces or multiple pieces in the center, tapering to smaller or fewer pieces on the sides. My classroom art display handouts are a great addition to any art classroom. You can use these to reference different arrangement styles as well as student label templates in my shop here or TPT here. These are easy to edit and print. I love having them on hand for parent helpers or for students to set up their own art displays.
I hope these tips give you ideas for ways you can showcase your student work. It’s so important to share you and your students’ hard work with your school community. I would love to hear the hacks you have found to display your student work.
Thanks for stopping by! Don’t forget to subscribe to my newsletter for art teacher updates straight to your inbox, and follow me on Instagram, TikTok, and Facebook! Until next time!

Related Posts


Leave a Reply