THE STORY
As I worked through my three books, traditions began falling into place. First, came the quote at the start of the book. A way to set the tone for the pages to come. Next, came the dedication to my book. The final page, a space for me to acknowledge the sacrifice and inevitable change in meaning for the book being used. By the time I settled into my third book, I began using the layout of the book as another source of inspiration for my pages.
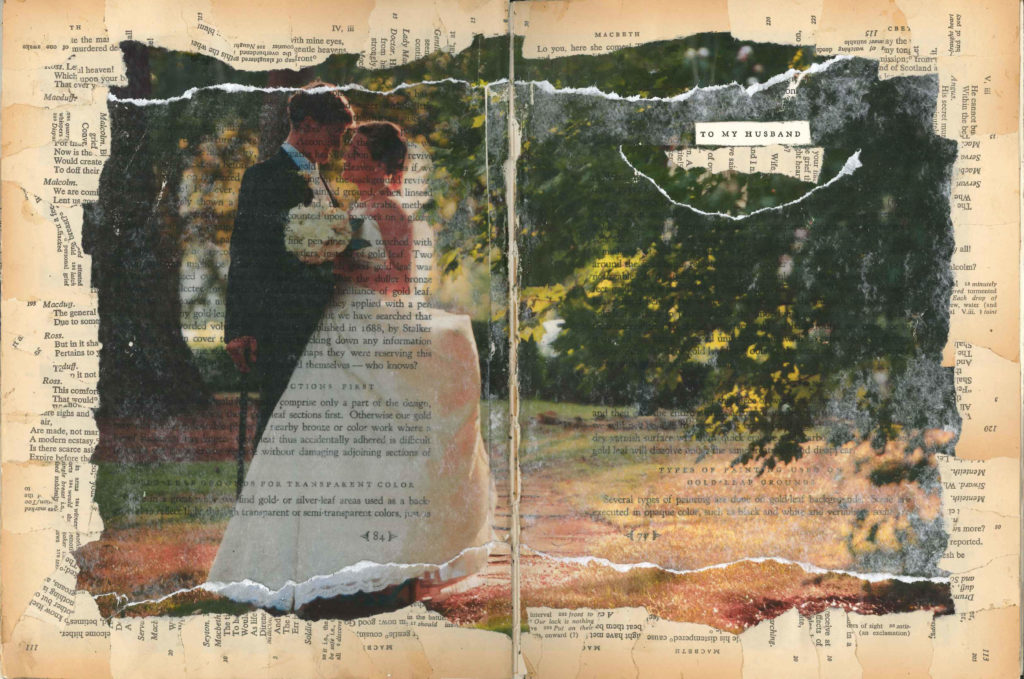
As I worked through the first few pages of this book, I found myself on the original dedication page. The author of “Early American Dedication” had a simple, yet powerful dedication: “To my husband.” An entire page with blank space made the single line even more meaningful, “To my husband.” The sense of a strong marriage, support, love, care, and encouragement resonated off the page. I made an immediate connection with the three-word sentence, and suddenly felt a sense of comradery with the author.
As I approach my 5-year wedding anniversary and 10-year dating anniversary, I feel a strong set of emotions. When I turn 29 I will have already spent almost a third of my life with the man I plan to spend the rest of my life with. At a young 19 I unknowingly met my match. A lot of changes take place between the ages of 19 and practically 30. The years of care-free, irresponsible, fun moved towards the first very broke years of being on your own. As you transition to your mid-twenties the inevitable first life crisis approaches, in the newly coined and very real quarter life crisis. Marriage, talks of children, and more responsibilities are added. I’m still a year and a half from thirty, but I am already terrified of what it means to be thirty. Thirty means real adulthood and real responsibility.
Through many major life changes, difficult transitions, and an amazing amount of fun, my main constant has been my Nick. Together we have grown up and grown closer as we dealt, and continue to deal, with the realty of adulthood and the inevitable bumps along the way. A lot happens in the course of ten years, and I still feel just as connected to him today as I did when we first started dating. I can’t wait for him to get home after work each day. He is the first person I tell exciting news, disappointments, frustrations, and ridiculous stories I read on the internet. I can’t imagine life without him.
As I worked through art school, exhausted myself trying to stay afloat my first years teaching, and as I explore new career options as a working educator and wanna-be working artist, he has always been right by my side providing the encouragement I need. When I joke about quitting my full-time job, and tells me to do it. He tells me we will find a way to make it work, because he wants me to be happy in whatever I am pursuing. When I look back at my income and expenses for my part time, working artist job, and realize despite a ton of hard work and successful shows, only a tiny profit was made, he points out how great it is that I am in the “black” my first year. He is the positive voice whispering in my ear, counteracting the negative voices in my head.
Nick makes me feel like I can accomplish whatever I want. He gives me the confidence I need to take the first step and try something new. After thinking back on all he has done for me, and how we have only grown stronger through the years, I realized this book also needed a simple dedication with endless meaning behind the words… To my husband.
SUPPLIES
- Visual journal
- Rubber cement
- Scissors
- Xacto knife
- Laser printer
- Laser printed image
- Mod podge
- Water
- Old book pages
HOW TO
When I decided to keep the original dedication as a part of my visual journal page, the design came together fairly easy. I had a wedding photo I loved, and it was perfectly cropped with us positioned on the left-hand side of the frame, leaving space to allow the original text to show through. To start the visual journal page, I printed the picture on a laser printer. I opted to do a mod podge image transfer, and reversed the image before printing it, because mod podge transfers create a mirror image of the original.
Once I had the image printed, I pulled other pages from my visual journal book to use as the base to transfer my image on. While I still planned to incorporate the original text, I decided I still wanted other text to show through the image. By completing the transfer on a separate sheet of paper, then gluing it back into the book, it also keeps the pages flatter, and less wrinkled, after it dries. I painted two layers of mod podge on the image, allowing them to dry between layers, then added a third layer, and while the mod podge was still wet, I laid it face down on the book pages. I allowed the mod podge to dry a third time, then wet the back of the image and rubbed the paper off. The end result is a semi-transparent image. To read more about mod podge transfers check out another post here.
After the mod podge transfer was complete, I laid the page on top of the original dedication page, and marked where the “To my husband” text was. Using an Xacto knife I cut through the page with the mod podge transfer, allowing the text to show through. I used rubber cement to glue the mod podge transferred pages on top of the dedication page.
Through the mod podge transfer process the edges of the image became a little messy. To cover this up, and create a more complete-looking page, I ripped up and glued down pieces of paper from an old, discolored book and another printout of the original image. When doing a mod podge transfer details often become fuzzy. I loved the lace at the bottom of my wedding dress, and decided I wanted to re-emphasize it. To do this I printed another copy of out wedding picture, ripped the bottom and top of the picture, and lined it up with the mod podge transfer. I used rubber cement to glue it down. To further emphasize the dedication, I added another section from the picture and old book pages beneath the line of text.
CHALLENGE
Create a visual journal page dedicating your book to someone supportive of your ventures in life.
Thanks for taking the time to check out my blog and read today’s post. Help me spread the word about my blog and visual journals in general by sharing with others on your social networking site of choice. Check out my visual journal lesson plan here and bundle pack here. Check out more visual journal blog posts here. Don’t forget to follow me on Instagram and TikTok for weekly visual journal demos. Until next time!


0 Comments