
This year I taught myself how to create gelli prints a few days before I started teaching it to students. I had been interested in trying it for a couple of years, especially after seeing a demo of it at the New York NAEA conference in 2017. When it came time to plan a quick, easy, and pretty looking project for an annual art fundraiser my school participates in, it all clicked in place. Now, you can use these gelli printing ideas in your classroom when teaching printing techniques!
This process is so easy, fast, and a lot of fun! It creates beautiful results with little risk. It’s perfect for a fundraiser project because generally every student will create a successful print. After playing around with the process I decided I wanted to take it a step further and incorporate this process into my intro to watercolor assignment.
But let’s start back at the beginning with a little how to.

For these gelli printing ideas and projects you need a gelli plate. I had enough plates to pair up my students, but it helps to have at least a few to pass around. Don’t cheap out! I tried buying two more at the last minute at an arts and crafts store. It was easily half the thickness and the paint didn’t transfer as solidly from the plate. I highly recommend the Gelli Arts brand. I especially loved the round print shape.
You will also need these different materials …
- High flow acrylic paints (or the cheap craft store paints or slightly watered down acrylic paint. Open acrylics work really well because they are slow drying)
- A brayer
- A barren (or a wood spoon or flat object)
- Thin watercolor paper (if incorporating the watercolor portion of the project), drawing paper works fine if not doing the watercolor addition
- Printer paper
- Leaves and other natural materials
- Stencils and texture plates to add additional texture as you print.
For the watercolor portion:
- Watercolor paints
- Paint brushes
- Rubbing alcohol in a spray bottle
- Salt
- Waterproof pen, or thin Sharpie
- Masking fluid
GELLI PRINTING IDEAS – THE PRINTING PROCESS

STEP ONE: The first step is to collect materials to print with. You can press textures, such as pine cones, into the plate and place flat objects on the plate to print with to create negative space. Look for leaves with interesting shapes. Large, simple shapes won’t print well. Think little leaves, ferns, interesting contour lines.
The natural objects don’t last well overnight. You may end up needing to collect new natural materials before every class. You can try pressing the leaves between flat, heavy objects to keep them from curling as they dry.
STEP TWO: Set up your station with your art supplies: paint colors, paper, texture plates, and natural objects. You will need a sheet of paper for the first print and a sheet of printer paper for the ghost print. A ghost print is a print taken after most of the paint has transferred during the first print. The ghost print helps clean up the plate for the next print, no need to rinse these off in between, and it creates a beautiful second image that can be displayed or used in collages, visual journals, etc.

STEP THREE: The next step is to apply the paint. Put 3-4 dime size dabs of paint on the plate. Try to keep similar colors together, don’t scatter different colors all over the plate or you will get a messier look. Consider color theory, what colors work well together? What happens if the colors you selected mix? Remember, complementary colors (yellow/purple, red/green, and blue/orange) create grays and browns when mixed. Roll over the paint with the brayer, roll over the plate until the entire plate is covered. If you see paint “peaks” where the brayer leaves texture behind, you might have too much paint on your plate. The above plate is a little heavy with excess paint.
TIP: Place one color on one side of the plate, another on the other side, and roll the brayer up and down until the colors start to mix in the center.

STEP FOUR: If applying a texture through a stencil, stamp, pine cone, or similar, do that before placing your leaves. Press your texture object into the plate, then lift it off. Paint should pull up with the object, leaving signs of the texture on the plate.

You can also add paintbrush texture by adding a few drops of paint onto the already rolled plate and spreading it out using a paintbrush. This texture will also transfer to the plate.

STEP FIVE: Place your leaves on the wet plate. Don’t move them once you place them, otherwise you may create unwanted lines and texture.
TIP: Try to move through these steps as quick as possible, unless you are using slow drying paint the paint may start to dry on the plate.
STEP SIX: Lay your printing paper on top, press the leaves down with your hand before rubbing over the back with the brayer. Make sure you move over the entire plate with the brayer, ensuring all the paint is being pressed to the paper.
STEP SEVEN: Lift the paper and enjoy your final print! Set it aside to dry.

STEP EIGHT: Remove the leaves and place a sheet of printer paper onto the plate. Rub over the back with your hands or a brayer, lift the paper, and enjoy your ghost print! This step is also an easy way to clean the plate. After this the plate is ready to be reused right away.
TIP: The above ghost print shows the correct amount of paint was used because the majority of the paint stuck to the first sheet of paper, leaving only the paint blocked by the pine needles and leaves behind for the ghost print. If your students have messy prints and a lot of paint left on the plate after printing, have them cut the amount of paint by half the next time around.
If you aren’t adding any watercolor to your print you are done at this point! Cut the extra paper off to center the print in the paper, try to leave a border for display. Mount the prints and display them. OPTIONAL: Display the prints with the ghost prints.

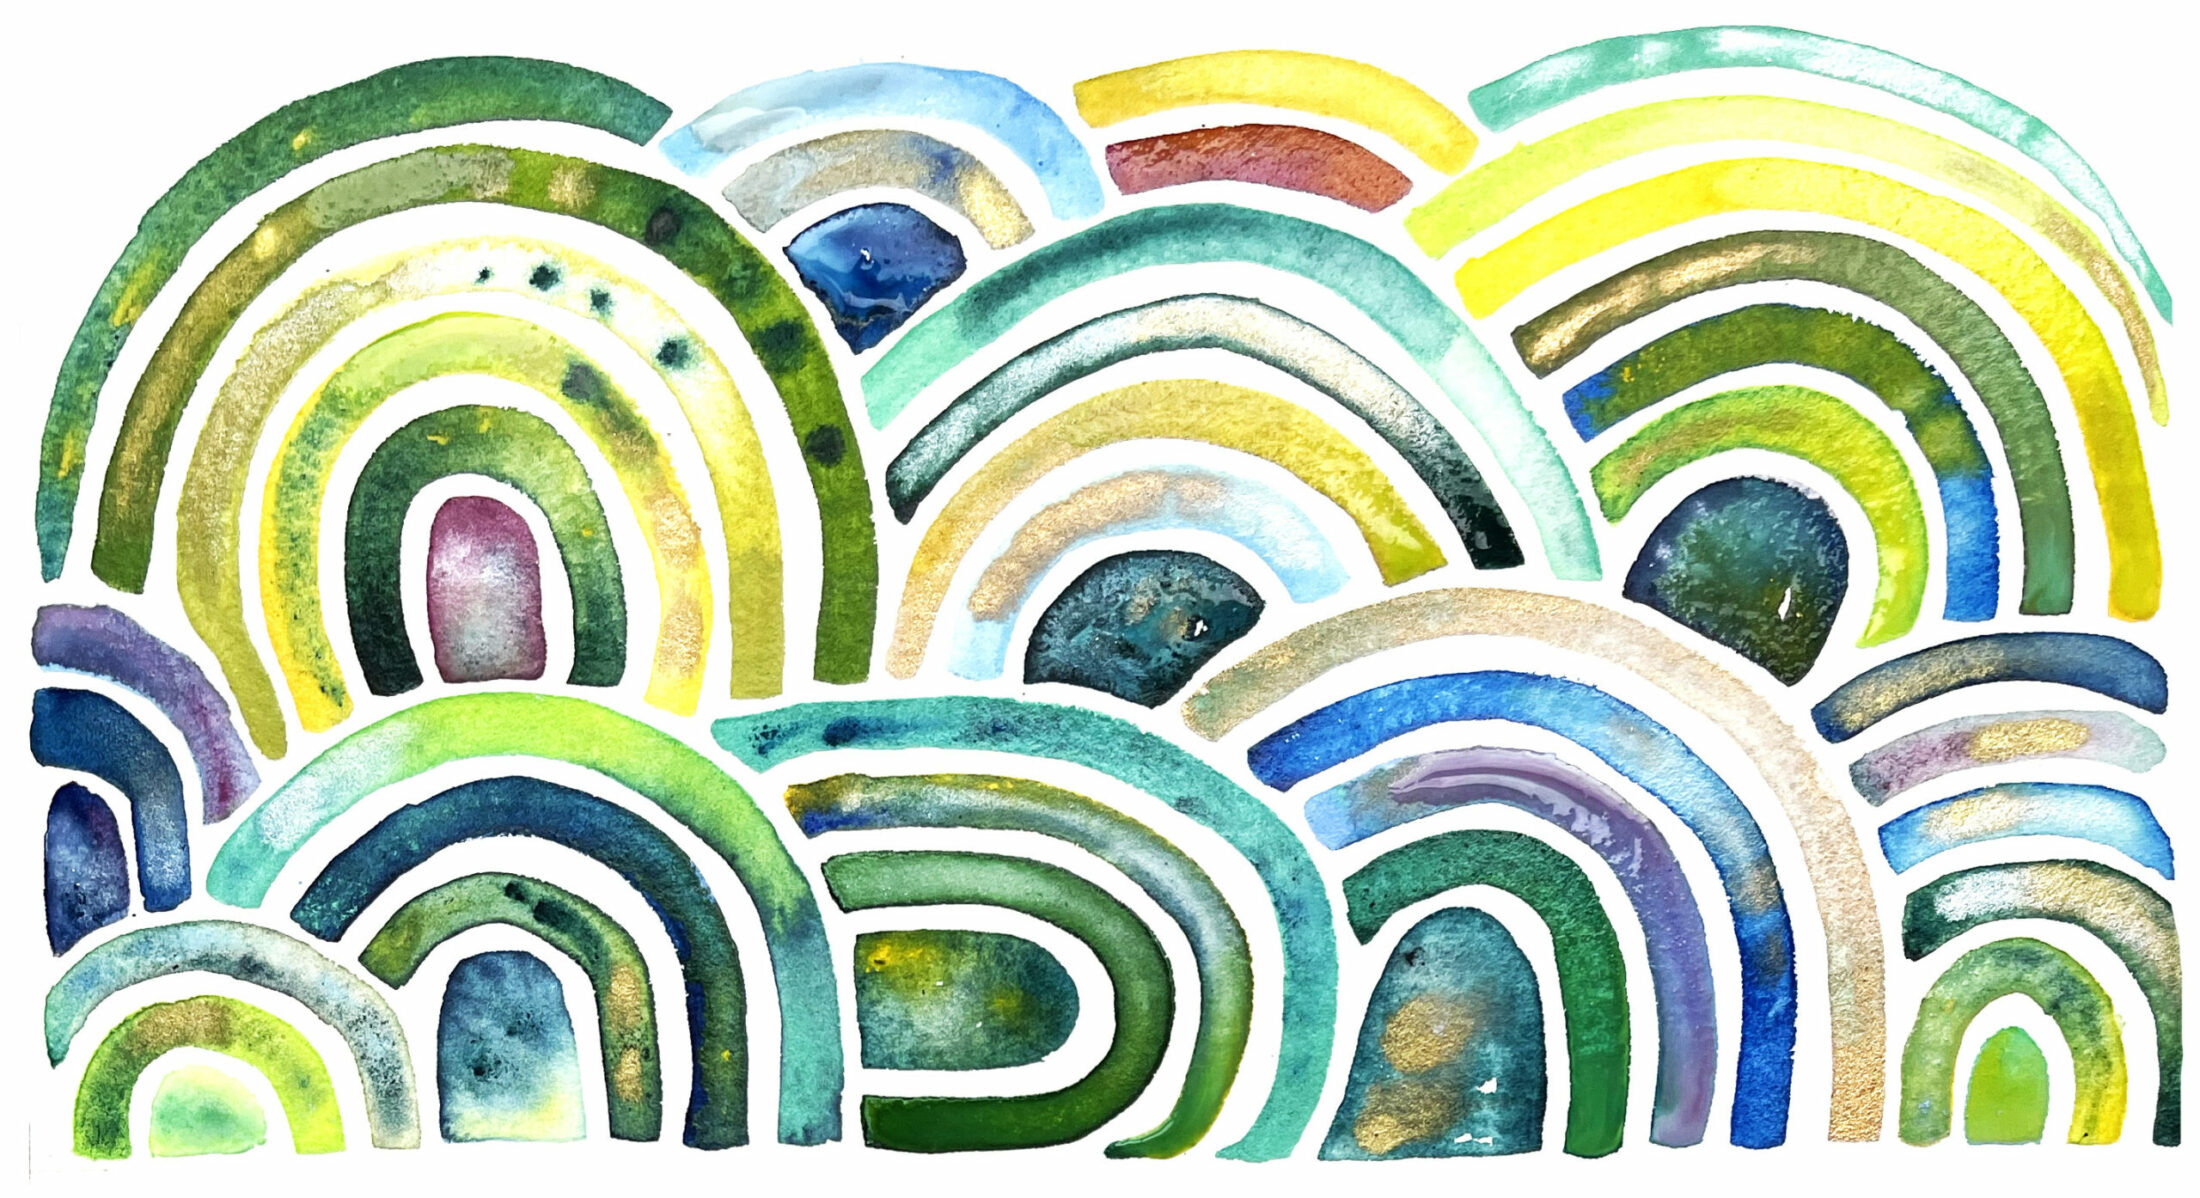
STEP NINE: Add watercolor to the negative space of the print. For this assignment, I had my student print until they got three successful prints. They selected two to test out 12 watercolor techniques and selected one to leave as is.
I have a watercolor handout and an instruction sheet that I give to my students to reference as they work. Both of these are included in my gelli print lesson plan you can also grab this on my website shop here. This lesson is now serving as my introduction to watercolor before moving into a more in-depth watercolor assignment.

This example shows the wet watercolor painting to the left and the painting after it dried with ink added. The ink helped define the fern and add texture.

Display the three gelli prints together. Cut the excess paper off, mount the finished print, and enjoy! You and your students will love the creative prints they make as they experience with different techniques.

If you have sketchbooks or visual journals in your class, encourage your students to save mess up prints and ghost prints to collage with in their journals. I will blog about collaging my ghost prints in the near future!
Thanks for taking the time to check out my blog on gelli printing ideas! Help me spread the word about art lessons, printmaking, gelli prints, and visual journaling by sharing with others. Interested in more visual journal stories, tips, and how tos? Check out my visual journal blog page here and my visual journal bundle on TPT here. Interested in other printmaking lessons? Check out a relief printmaking blog post here and my printmaking lessons here. Thanks for taking the time to check out my blog! Help spread the word and get involved with visual journaling and its unlimited possibilities by following, sharing, and commenting!
I’ve been sharing a lot of my day to day activities, student work, and art and yearbook lessons on my Instagram. Follow along here!
One response to “Gelli Printing Ideas From a Self Taught Printmaker”
Leave a Reply
Related Posts
I love what you did with these! They came out great!